Update – Following community feedback, Timeout Settings have now been added to the script
Update – The HA settings in this post also apply to XenServer 6.5.0 onwards
Warning: If you have applied Hotfix XS62ESP1004 to your XenServer 6.2 infrastructure and have not enabled Pool HA, in the event of your Pool Master going down, a Slave Host will NOT take over as Pool Master and you will lose connectivity via XenCenter. All Hosts will go into Alert state within CloudStack so you will have reduced functionality within your CloudStack Cloud. This article covers how to correctly configure Pool HA and how to manage your XenServers once HA is enabled.
Introduction
Traditionally when using Citrix XenServer with Apache CloudStack / Citrix CloudPlatform (simply referred to CloudStack for the rest of this article) the XenServer HA Feature was not enabled as CloudStack took care of all HA events, however the release of XS62ESP1004 changed a few things.
With the release of XS62ESP1004, the way XenServer handles the loss of its Pool Master has changed and rather than having to manually promote a Slave to become a Pool Master, the XenServer Pool can now ‘Self Heal’ which is great news, however you need to do some additional configuration for this magic to happen.
The important thing to understand is that CloudStack still takes care of all the VM HA events so we do not want to give XenServer control over the VMs. In fact all we are doing is enabling ‘Pool Master HA’ so that in the event of a failure of the Pool Master, a new Pool Master is elected.
Configuring Pool HA
The first step is to ensure all your Hosts in the Pool have XS62ESP1004 installed. If deploying a new batch of XenServers for use with CloudStack its best practise to install all appropriate Hotfixes before adding the Hosts into CloudStack.
Once your Hosts are in a Pool and all networking and bonds are configured etc you need to add a dedicated Storage Repository which will be used only by the Pool Master HA mechanism. I generally name this ‘MGMT-HA’ as its handling the HA of the Pool Management elements etc. This can be a NFS or iSCSI mount but only needs to be 1 GB in size. The important thing is that it is only used for HA and is not added into CloudStack as Primary Storage.
Once the SR is configured and online, the next step is to enable HA. This ‘could’ be enabled using the XenCenter UI, however there is a risk you will inadvertently enable VM HA which could cause you all sorts of problems. In addition you will probably be disabling and re-enabling this on a regular basis so putting together a simple script to enable / re-enable HA when required is a much better option.
To allow for failover of network storage controllers the ha timeout should be set to a minimum of 90 secs, this is to prevent premature self fencing. If after testing this timeout is not long enough, increase the timeout and test again.
Add the following into a simple bash script and place on your hosts (you can run it from any Host, not just the Pool Master) Note how it references the SR name ‘MGMT-HA’ so if you use a different naming convention simply update the script to match your SR name.
#!/bin/bash
MGMTHAUUID=`xe sr-list name-label=MGMT-HA --minimal`
xe pool-ha-enable heartbeat-sr-uuids=$MGMTHAUUID ha-config:timeout=90
echo "Pool HA is now enabled"
Now simply run the script and wait for the confirmation message “Pool HA is now enabled” it can take a couple of minutes so be patient.
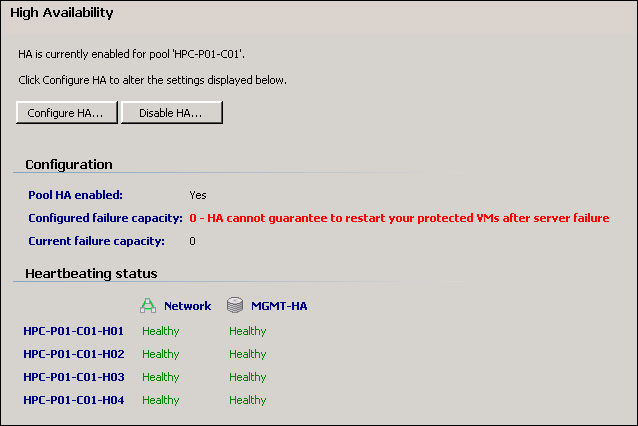
When reviewing the settings within XenCenter, you could be forgiven for thinking that HA is not enabled, when in fact it is, but only for the Pool Master and not the VMs which are still protected by CloudStack.
Having Pool HA enabled unfortunately does add some extra complication to the management of your XenServer Pool so please read on to learn how to deal with failures and how to perform planned restarts etc.
Automatic Handling of Host Failures
If the Pool Master goes down a Slave will take over and all VMs which were running on the failed Pool Master will be automatically restarted on alternate Hosts, but only as long as their Compute Offering had the ‘Offer HA’ feature enabled.
CloudStack still takes care of the restarting of the VMs and will initiate the restart only after the new Pool Master has taken over and the time out controlled by the global setting ‘alert.wait’ has expired. In the system used for the following tests, alert.wait was set to 60 seconds. The default value is ‘blank’ which results in a delay of 30 mins once the Host has been detected as being down by CloudStack.
The following timings were observed on a production system which was undergoing testing. The system was running Apache CloudStack 4.3.2, the Hosts were CISCO UCS running XenServer 6.2 with all available updates applied (up to XS62ESP1014). Storage was provided by SolidFire and networking was 10GB CISCO. Ten Windows 2008 R2 VMs were running on the system along with the usual array of System VMs. Each Cluster had 4 Hosts and the tests were performed on two Clusters at the same time. All VMs were running on the Pool Masters to cause maximum impact from the simulated failure. Timings are in Minutes and Seconds from the start of the test:
Start – Pool Master Failure simulated by killing power to Hosts via CIMC
01:15 – XenCenter detected host failures and lost connection
03:00 – XenCenter reconnected to new Pool Masters
03:15 – CloudStack confirmed failure of Hosts
03:30 – CloudStack initiated HA as VMs have now been down for over the configured 60 secs set by alert.wait
05:30 – All ten Windows VMs and System VMs were reported by CloudStack as ‘Running’
So in summary, following a failure of the XenServer Pool Masters in two Clusters, which is a worst case scenario, within 5 mins 30 secs all 10 Windows VMs, 4 Virtual Routers, and 3 System VMs were back online without any administrator input.
Recovering from Host Failures
Once the ‘failed’ pool masters are restored by simply powering them back on, they should automatically reconnect to the Pool
However if the host fails to automatically reconnect, and is not accessible via XenCenter, to re-enable them you need to disable HA on the Pool and also disable HA on the Host, which still thinks it is a Pool Master and will have gone into ‘Emergency Mode’. To do this first disable HA on the Pool using XenCenter, then run the following command on the recovered Host
xe host-emergency-ha-disable --force
After a short delay the Host will reconnect to the Pool as a Slave and then come back online within CloudStack.
If a Slave Host goes down, after it is restored, before it will re-connect to the Pool, HA on the Pool ‘may’ need to be disabled, but there is no need to force disable HA on the Host as it should not go into Emergency Mode as the Pool Master will be accessible when the Host boots.
Once the failed hosts is back online, the Pool HA should be re-enabled by re-running the script which enables HA
Managing XenServers when Pool HA is enabled
Occasionally you will need to restart or Shutdown a XenServer Host which is part of a CloudStack Cluster and belongs to a Pool which has Pool HA enabled. The following sections list the correct actions to be taken:
To perform a controlled restart of a Slave Host:
1. Place into Maintenance Mode within CloudStack
2. Restart the Host
3. Exit Maintenance Mode in CloudStack
To perform a controlled restart of a Pool Master Host:
1. Place into Maintenance Mode within CloudStack
2. Disable Pool HA
3. Place the Host into Maintenance Mode with XenCenter to force the promotion of a Slave to Pool Master
4. Restart the Host
5. Once Host has fully booted and is online in XenCenter re-enable Pool HA
6. Exit Maintenance Mode in XenCenter
7. Exit Maintenance Mode in CloudStack
To shutdown a Host for an extended period of time: (Pool Masters should be demoted to a Slave)
1. Place into Maintenance Mode within CloudStack
2. Disable Pool HA
3. Place into Maintenance Mode with XenCenter
4. Shutdown the Host
5. Enable Pool HA
6. Exit Maintenance Mode in CloudStack
When you wish to bring the Host back on line
a. Disable Pool HA
b. Power on Host, then once Host has fully booted and is online in XenCenter re-enable Pool HA
c. Exit Maintenance Mode in XenCenter
d. Exit Maintenance Mode in CloudStack
Summary
After installing XS62ESP1004 you MUST enable HA on your XenServer Pools, and this results in a different approach to managing your XenServer resources.
About the Author
Geoff Higginbottom is CTO of ShapeBlue, the strategic cloud consultancy. Geoff spends most of his time designing private & public cloud infrastructures for telco’s, ISP’s and enterprises based on CloudStack.
ha-config:timeout=90
Steve Roles is ShapeBlue’s COO and is responsible for all day to day administrative and operational functions of the business, including the consulting, programme management, and support functions. Involved with CloudStack since 2012, Steve has led several large customer engagements including a number of major public and private cloud deployments; co-ordinated and developed worldwide teams and helped implement and deliver an enterprise grade support product.
Away from work, Steve is a music lover and semi-professional musician. Although he doesn’t speak at many technology conferences, he can sometimes be heard providing the evening entertainment.