
Introduction
If you are new to Apache CloudStack and want to learn the concepts but do not have all the equipment required to stand-up a test environment, why not use your existing PC and VirtualBox.
VirtualBox is a cross platform virtualisation application which runs on OSX, Windows, Linux and Solaris, meaning no matter what OS you are running, you should be able to run VirtualBox.
The aim of this exercise is to build an Apache CloudStack environment which is as close to a Production deployment as possible, within the obvious constraints of running it all on a laptop. This deployment will support the following key functions of Apache CloudStack:
Production Grade Hypervisor: Citrix XenServer 6.2 with full VLAN support
Apache CloudStack on CentOS 6.5
NFS for Primary and Secondary Storage – each on a dedicated VLAN
Console Proxy and Secondary Storage VM
All Advanced Networking features such as Firewall, NAT, Port Forwarding, Load Balancing, VPC
To achieve all of this we need to deploy two VMs on VirtualBox, a CentOS VM for Apache Cloudstack, and a Citrix XenServer VM for our Hypervisor. The CloudStack VM will also act as our MySQL Server and NFS Server.
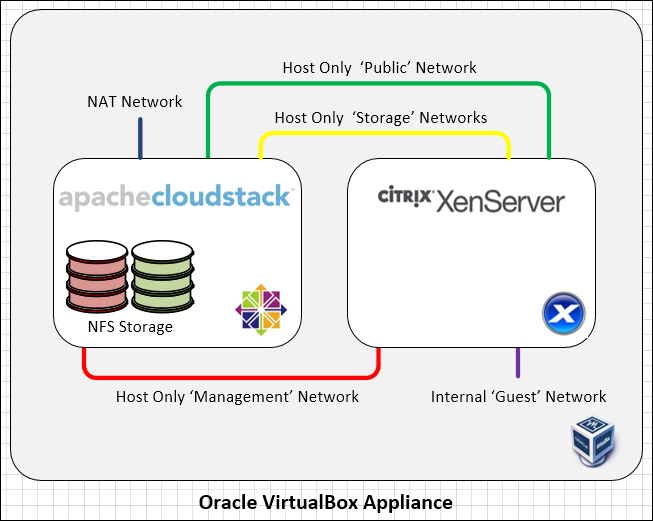
A key requirement of this test environment is to keep it completely self-contained so it can be used for training (insert link to Bootcamp) and demos etc. To achieve this, and maintain the ability to deploy a new Zone and download the example CentOS Template to use in the system, we simulate the CloudStack Public Network and host the Default CentOS Template on the CloudStack Management Server VM using NGINX.
VirtualBox Configuration
Download and install the appropriate version from https://www.virtualbox.org/wiki/Downloads
Once VirtualBox is installed we need to configure it ready for this environment. The defaults are used where possible, but if you have been using VirtualBox already, you may have different settings which need to be adjusted.
We will be using three ‘Host Only’ networks, one ‘Nat’ network, and an ‘Internal’ network. By default VirtualBox has only one ‘Host Only’ network so we need to create two more.
- From the ‘file’ menu (windows) or VirtualBox menu (OSX), select ‘Preferences’ then ‘Network’ then ‘Host-only Networks’
- Add two more networks so you have at least 3 which we can use
- Setup the IP Schema for the 1st two networks as follows:
The naming conventions for Host Only Networks differs depending on the Host OS, I will simply refer to these as
‘Host Only Network 1’, 2 and 3 etc so please refer to the following comparison matrix to identify the correct Network.
| This Guide | Windows | OSX |
| Host Only Network 1 | VirtualBox Host Only Ethernet Adapter | vboxnet0 |
| Host Only Network 2 | VirtualBox Host Only Ethernet Adapter #2 | vboxnet1 |
| Host Only Network 3 | VirtualBox Host Only Ethernet Adapter #3 | vboxnet2 |
Host Only Network 1:
IPv4 Address: 192.168.56.1
IPv4 Network Mask: 255.255.255.0
DHCP Server is optional as we don’t use it, but ensure the range does not clash with the static IPs we will be using which are 192.168.56.11 & 192.168.56.101
Host Only Network 2:
IPv4 Address: 172.30.0.1
IPv4 Network Mask: 255.255.255.0
By setting up these IP ranges, we ensure our host laptop has an IP on these Networks so we can access the VMs connected to them. We don’t need an IP on ‘Host Only Network 3’ as this will be used for storage and will also be running VLANs.
We use a NAT Network so that we can connect the CloudStack Management VM to the internet to enable the installation of the various packages we will be using.
Configure the VirtualBox ‘NatNetwork’ to use the following settings:
Network Name: NatNetwork
Network CIDR: 10.0.2.0/24
We disable DHCP as we cannot control the range to exclude our statically assigned IPs on our VMs.
Whilst this article focuses on creating a single CloudStack Management Server, you can easily add a second, and I have found that the DHCP allocated IPs from the NAT Network can change randomly, so setting up NAT Rules can be problematic, hence I always use statically assigned IPs.
The ‘Internal’ Network requires no configuration.
CloudStack VM
Create a VM for CloudStack Manager using the following Settings:
Name: CSMAN 4.4.1
Type: Linux
Version: Red Hat (64 bit)
RAM: 2048 (you cannot go lower than this for initial setup)
Hard Drive: VDI – Dynamic – 64 GB (we allocate this much as it will act as NFS Storage)
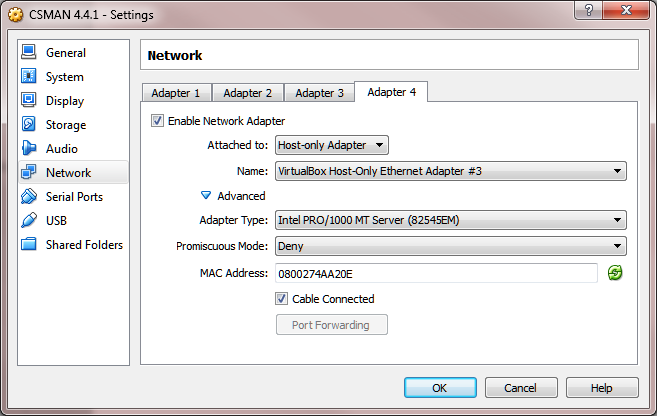
Note: VirtualBox seems to mix up the networks if you add them all at the same time so we add the 1st Network and install CentOS, then once fully installed, we add the additional networks, rebooting in-between. This appears to be a bug in the latest versions of VirtualBox (4.3.18 at the time of writing)
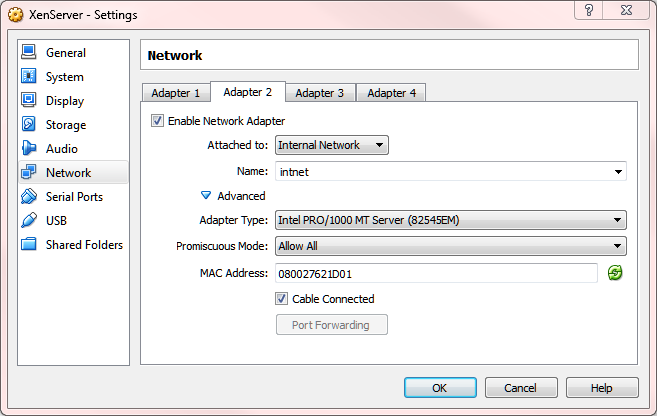
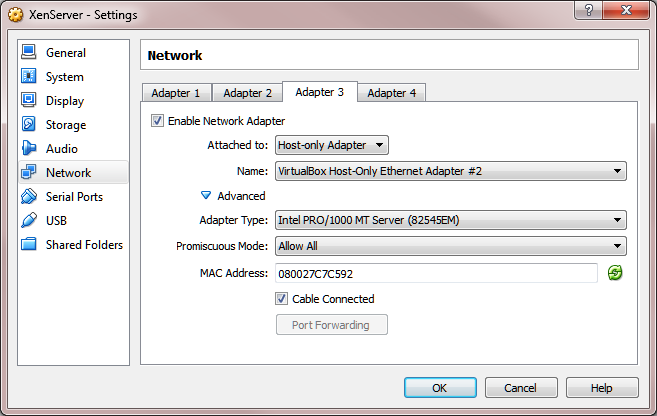
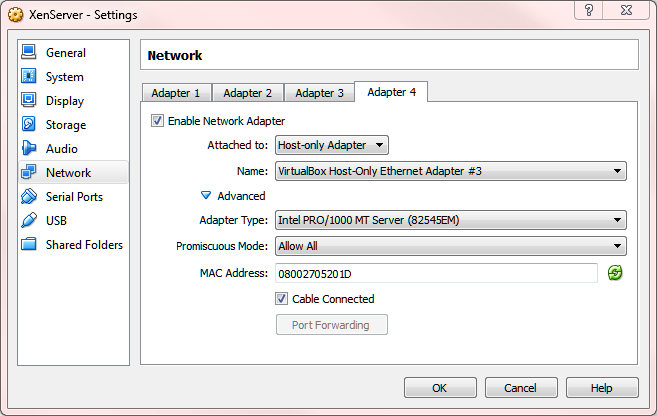
Modify the settings and assign ONLY the 1st network Adapter correct networks as follows:
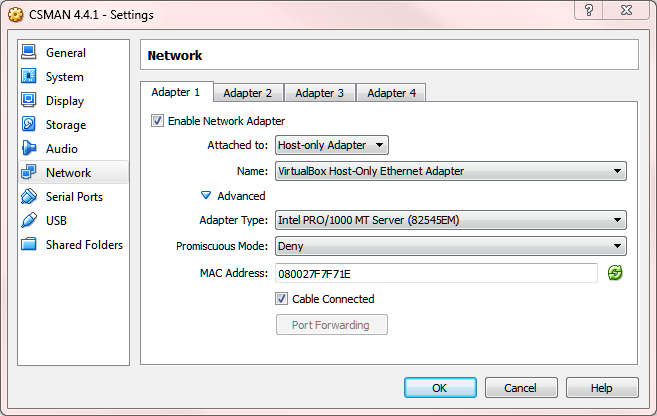
Install CentOS 6.5 64-bit minimal, set the Hostname to CSMAN, and IP address to 192.168.56.11/24 with a gateway of 192.168.56.1, and ensure the network is set to start on boot. Set DNS to public servers such as 8.8.8.8 & 8.8.4.4
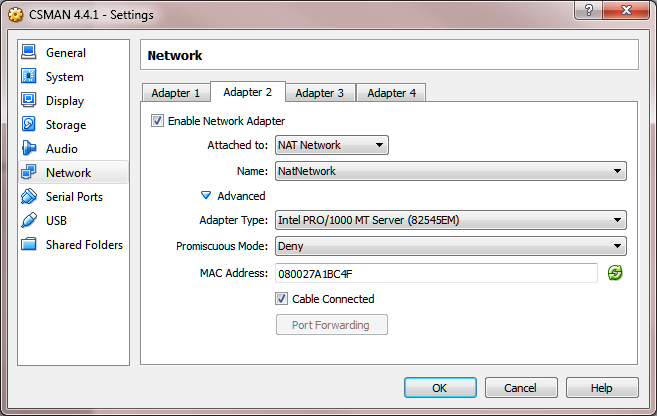
Once the install is completed reboot the VM and confirm eth0 is active, then shutdown the VM and add the 2nd Network Adapter
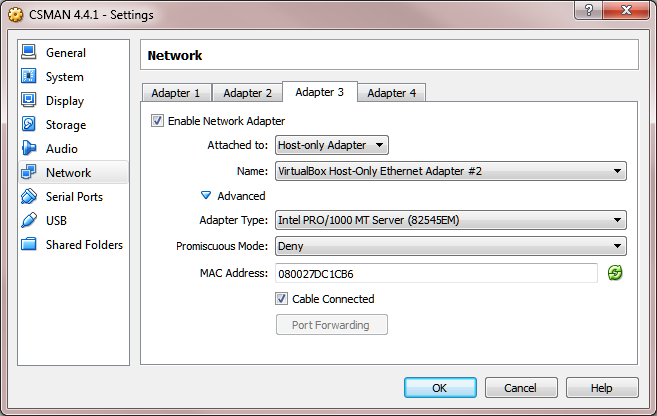
Boot the VM so it detects the NIC, then shut down and add the 3rd Adapter
Boot the VM so it detects the NIC, then shut down and add the 4th Adapter
Finally, boot the VM so it detects the last adapter and then we can configure the various interfaces with the correct IP schemas.
ifcfg-eth0
DEVICE=eth0
TYPE=Ethernet
IPADDR=192.168.56.11
PREFIX=24
ONBOOT=yes
NM_CONTROLLED=no
BOOTPROTO=none
IPV4_FAILURE_FATAL=yes
IPV6INIT=no
NAME=MGMT
ifcfg-eth1
DEVICE=eth1
TYPE=Ethernet
IPADDR=10.0.2.11
GATEWAY=10.0.2.1
PREFIX=24
ONBOOT=yes
NM_CONTROLLED=no
BOOTPROTO=none
DEFROUTE=yes
PEERROUTES=yes
IPV4_FAILURE_FATAL=yes
IPV6INIT=no
NAME=NAT
ifcfg-eth2
DEVICE=eth2
TYPE=Ethernet
IPADDR=172.30.0.11
PREFIX=24
ONBOOT=yes
NM_CONTROLLED=no
BOOTPROTO=none
IPV4_FAILURE_FATAL=yes
IPV6INIT=no
NAME=PUBLIC
ifcfg-eth3
DEVICE=eth3
TYPE=Ethernet
BOOTPROTO=none
ONBOOT=yes
MTU=9000
VLAN=yes
USERCTL=no
MTU=9000
ifcfg-eth3.100
DEVICE=eth3.100
TYPE=Ethernet
IPADDR=10.10.100.11
PREFIX=24
ONBOOT=yes
BOOTPROTO=none
NAME=PRI-STOR
VLAN=yes
USERCTL=no
MTU=9000
ifcfg-eth3.101
DEVICE=eth3.101
TYPE=Ethernet
IPADDR=10.10.101.11
PREFIX=24
ONBOOT=yes
BOOTPROTO=none
NAME=SEC-STOR
VLAN=yes
USERCTL=no
MTU=9000
Restart networking to apply the new settings, then apply all the latest updates
service networking restart
yum update -y
You can now connect via SSH using Putty to continue the rest of the configuration so you can copy and paste commands and settings etc
Installation and Configuration
With the base VM built we now need to install Apache CloudStack and all the other services this VM will be hosting. First we need to ensure the VM has the correct configuration.
Selinux
Selinux needs to be set to ‘permissive’, we can achieve this by running the following commands:
setenforce permissive
sed -i "/SELINUX=enforcing/ c\SELINUX=permissive" /etc/selinux/config
Hostname
The CloudStack Management Server should return its FQDN when you run hostname –fqdn, but as we do not have a working DNS installation it will probably return ‘unknown-host’ To resolve this we simply add an entry into the Hosts file, and while we are there, we may as well add one for the xenserver as well. Update /etc/hosts with the following, then reboot for it to take effect.
127.0.0.1 localhost localhost.cstack.local
192.168.56.11 csman.cstack.local csman
192.168.56.101 xenserver.cstack.local xenserver
Speed up SSH Connections
As you will want to use SSH to connect to the CloudStack VM its worth turning off the DNS Check to speed up the connection. Run the following commands
sed -i "/#UseDNS yes/ c\UseDNS no" /etc/ssh/sshd_config
service sshd restart
NTP
It’s always a good idea to install NTP so let’s add it now, and set it to start on boot (you can always configure this VM to act as the NTP Server for the XenServer, but that’s out of scope for this article)
yum install -y ntp
chkconfig ntpd on
service ntpd start
CloudStack Repo
Setup the CloudStack repo by running the following command:
echo "[cloudstack]
name=cloudstack
baseurl=http://packages.shapeblue.com/cloudstack/main/centos/4.4
enabled=1
gpgcheck=1" > /etc/yum.repos.d/cloudstack.repo
Import the ShapeBlue gpg release key: (Key ID 584DF93F, Key fingerprint = 7203 0CA1 18C1 A275 68B1 37C4 BDF0 E176 584D F93F)
yum install wget -y
wget http://packages.shapeblue.com/release.asc
sudo rpm --import release.asc
Install CloudStack and MySQL
Now we can install CloudStack and MySQL Server
yum install -y cloudstack-management mysql-server
Setup NFS Server
As the CSMAN VM will also be acting as the NFS Server we need to setup the NFS environment. Run the following commands to create the folders for Primary and Secondary Storage and then export them to the appropriate IP ranges.
mkdir /exports
mkdir -p /exports/primary
mkdir -p /exports/secondary
chmod 777 -R /exports
echo "/exports/primary 10.10.100.0/24(rw,async,no_root_squash)" > /etc/exports
echo "/exports/secondary 10.10.101.0/24(rw,async,no_root_squash)" >> /etc/exports
exportfs -a
We now need to update /etc/sysconfig/nfs with the settings to activate the NFS Server. Run the following command to update the required settings
sed -i -e '/#MOUNTD_NFS_V3="no"/ c\MOUNTD_NFS_V3="yes"' -e '/#RQUOTAD_PORT=875/ c\RQUOTAD_PORT=875' -e '/#LOCKD_TCPPORT=32803/ c\LOCKD_TCPPORT=32803' -e '/#LOCKD_UDPPORT=32769/ c\LOCKD_UDPPORT=32769' -e '/#MOUNTD_PORT=892/ c\MOUNTD_PORT=892' -e '/#STATD_PORT=662/ c\STATD_PORT=662' -e '/#STATD_OUTGOING_PORT=2020/ c\STATD_OUTGOING_PORT=2020' /etc/sysconfig/nfs
We also need to update the firewall settings to allow the XenServer to access the NFS exports so run the following to setup the required settings
sed -i -e "/:OUTPUT/ a\-A INPUT -p tcp -m tcp --dport 111 -j ACCEPT" /etc/sysconfig/iptables
sed -i -e "/:OUTPUT/ a\-A INPUT -p udp -m udp --dport 111 -j ACCEPT" /etc/sysconfig/iptables
sed -i -e "/:OUTPUT/ a\-A INPUT -p tcp -m tcp --dport 2049 -j ACCEPT" /etc/sysconfig/iptables
sed -i -e "/:OUTPUT/ a\-A INPUT -p udp -m udp --dport 2049 -j ACCEPT" /etc/sysconfig/iptables
sed -i -e "/:OUTPUT/ a\-A INPUT -p tcp -m tcp --dport 2020 -j ACCEPT" /etc/sysconfig/iptables
sed -i -e "/:OUTPUT/ a\-A INPUT -p tcp -m tcp --dport 32803 -j ACCEPT" /etc/sysconfig/iptables
sed -i -e "/:OUTPUT/ a\-A INPUT -p udp -m udp --dport 32769 -j ACCEPT" /etc/sysconfig/iptables
sed -i -e "/:OUTPUT/ a\-A INPUT -p tcp -m tcp --dport 892 -j ACCEPT" /etc/sysconfig/iptables
sed -i -e "/:OUTPUT/ a\-A INPUT -p udp -m udp --dport 892 -j ACCEPT" /etc/sysconfig/iptables
sed -i -e "/:OUTPUT/ a\-A INPUT -p tcp -m tcp --dport 875 -j ACCEPT" /etc/sysconfig/iptables
sed -i -e "/:OUTPUT/ a\-A INPUT -p udp -m udp --dport 875 -j ACCEPT" /etc/sysconfig/iptables
sed -i -e "/:OUTPUT/ a\-A INPUT -p tcp -m tcp --dport 662 -j ACCEPT" /etc/sysconfig/iptables
sed -i -e "/:OUTPUT/ a\-A INPUT -p udp -m udp --dport 662 -j ACCEPT" /etc/sysconfig/iptables
service iptables restart
Then we set the nfs service to autostart on boot, and also start it now
chkconfig nfs on
service nfs start
Setup MySQL Server
The following command will adjust the MySQL Configuration for this environment
sed -i -e '/datadir/ a\innodb_rollback_on_timeout=1' -e '/datadir/ a\innodb_lock_wait_timeout=600' -e '/datadir/ a\max_connections=350' -e '/datadir/ a\log-bin=mysql-bin' -e "/datadir/ a\binlog-format = 'ROW'" -e "/datadir/ a\bind-address = 0.0.0.0" /etc/my.cnf
Then we set the mysqld service to autostart on boot, and also start it now
chkconfig mysqld on
service mysqld start
It’s always a good idea to secure a default install of MySQL and there is a handy utility to do this for you. Run the following command, setting a new password when prompted, (the current password will be blank) and accept all of the defaults to remove the anonymous user, test database and disable remote access etc.
mysql_secure_installation
Now we will login into MySQL and assign all privileges to the root account, this is so it can be used to create the ‘cloud’ account in a later step
mysql -u root -p  (enter password when prompted)
mysql> GRANT ALL PRIVILEGES ON *.* TO 'root'@'%' WITH GRANT OPTION;
mysql> quit
Setup Databases
With MySQL configured we can now setup the CloudStack Databases by running the following two commands, substituting your root password you setup earlier
cloudstack-setup-databases cloud:<password>@127.0.0.1 --deploy-as=root:<password>
cloudstack-setup-management
Nginx
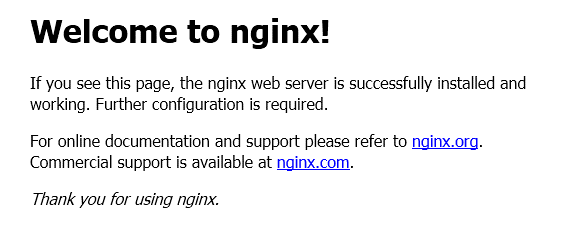
There is a default example template which gets downloaded from the cloud.com web servers, but as this test system has no real public internet access we need to provide a way for the Secondary Storage VM to download this template. We achieve this by installing NGINX on the CSMAN VM, and use it to host the Template on our simulated ‘Public’ network.
First create the NGINX repo by running the following command:
echo "[nginx]
name=nginx repo
baseurl=http://nginx.org/packages/centos/\$releasever/\$basearch/
gpgcheck=0
enabled=1" > /etc/yum.repos.d/nginx.repo
Then install NGINX by running the following command
yum install nginx -y
Now we download the example CentOS Template for XenServer by running the following two commands
cd /usr/share/nginx/html
wget -nc http://download.cloud.com/templates/builtin/centos56-x86_64.vhd.bz2
We need to add a firewall rule to allow access via port 80 so run the following two commands
sed -i -e "/:OUTPUT/ a\-A INPUT -p tcp -m tcp --dport 80 -j ACCEPT" /etc/sysconfig/iptables
service iptables restart
Finally we start the nginx service, then test it by accessing http://192.168.56.11/ from the Host laptop
service nginx start
XenServer vhd-util
As we will be using Citrix XenServer as our Hypervisor we need to download a special utility which will get copied to every XenServer when it is added to the system. Run the following lines to download the file and update the permissions.
cd /usr/share/cloudstack-common/scripts/vm/hypervisor/xenserver/
wget http://download.cloud.com.s3.amazonaws.com/tools/vhd-util
chmod 755 /usr/share/cloudstack-common/scripts/vm/hypervisor/xenserver/vhd-util
Seed the CloudStack Default System VM Template
With now we need to seed the Secondary Storage with the XenServer System VM Template so run the following command
/usr/share/cloudstack-common/scripts/storage/secondary/cloud-install-sys-tmplt -m /exports/secondary -u http://packages.shapeblue.com/systemvmtemplate/4.4/4.4.1/systemvm64template-4.4.1-7-xen.vhd.bz2 -h xenserver -F
CloudStack Usage Server
An optional step is to install the CloudStack Usage Service, to do so run the following command
yum install cloudstack-usage -y
service cloudstack-usage start
Customise the Configuration
For this test system to work within the limited resources available on a 4GB RAM Laptop, we need to make a number of modifications to the configuration.
Firstly we need to enable the use of a non HVM enabled XenServer. When you install XenServer on VirtualBox it warns you that it will only support PV and not HVM. To get around this we run the following SQL update command to add a new line into the Configuration table in the Cloud Database (remember to substitute your own MySQL Cloud password you used when you setup the CloudStack Database)
mysql -p<password> cloud -e \ "INSERT INTO cloud.configuration (category, instance, component, name, value, description) VALUES ('Advanced', 'DEFAULT', 'management-server', 'xen.check.hvm', 'false', 'Shoud we allow only the XenServers support HVM');"
The following MySQL commands update various global settings, and change the resources allocated to the system VMs so they will work within the limited resources available.
mysql -u cloud -p<password>
UPDATE cloud.configuration SET value='8096' WHERE name='integration.api.port';
UPDATE cloud.configuration SET value='60' WHERE name='expunge.delay';
UPDATE cloud.configuration SET value='60' WHERE name='expunge.interval';
UPDATE cloud.configuration SET value='60' WHERE name='account.cleanup.interval';
UPDATE cloud.configuration SET value='60' WHERE name='capacity.skipcounting.hours';
UPDATE cloud.configuration SET value='0.99' WHERE name='cluster.cpu.allocated.capacity.disablethreshold';
UPDATE cloud.configuration SET value='0.99' WHERE name='cluster.memory.allocated.capacity.disablethreshold';
UPDATE cloud.configuration SET value='0.99' WHERE name='pool.storage.capacity.disablethreshold';
UPDATE cloud.configuration SET value='0.99' WHERE name='pool.storage.allocated.capacity.disablethreshold';
UPDATE cloud.configuration SET value='60000' WHERE name='capacity.check.period';
UPDATE cloud.configuration SET value='1' WHERE name='event.purge.delay';
UPDATE cloud.configuration SET value='60' WHERE name='network.gc.interval';
UPDATE cloud.configuration SET value='60' WHERE name='network.gc.wait';
UPDATE cloud.configuration SET value='600' WHERE name='vm.op.cleanup.interval';
UPDATE cloud.configuration SET value='60' WHERE name='vm.op.cleanup.wait';
UPDATE cloud.configuration SET value='600' WHERE name='vm.tranisition.wait.interval';
UPDATE cloud.configuration SET value='60' WHERE name='vpc.cleanup.interval';
UPDATE cloud.configuration SET value='4' WHERE name='cpu.overprovisioning.factor';
UPDATE cloud.configuration SET value='8' WHERE name='storage.overprovisioning.factor';
UPDATE cloud.configuration SET value='192.168.56.11/32' WHERE name='secstorage.allowed.internal.sites';
UPDATE cloud.configuration SET value='192.168.56.0/24' WHERE name='management.network.cidr';
UPDATE cloud.configuration SET value='192.168.56.11' WHERE name='host';
UPDATE cloud.configuration SET value='false' WHERE name='check.pod.cidrs';
UPDATE cloud.configuration SET value='0' WHERE name='network.throttling.rate';
UPDATE cloud.configuration SET value='0' WHERE name='vm.network.throttling.rate';
UPDATE cloud.configuration SET value='GMT' WHERE name='usage.execution.timezone';
UPDATE cloud.configuration SET value='16:00' WHERE name='usage.stats.job.exec.time';
UPDATE cloud.configuration SET value='true' WHERE name='enable.dynamic.scale.vm';
UPDATE cloud.configuration SET value='9000' WHERE name='secstorage.vm.mtu.size';
UPDATE cloud.configuration SET value='60' WHERE name='alert.wait';
UPDATE cloud.service_offering SET ram_size='128', speed='128' WHERE vm_type='domainrouter';
UPDATE cloud.service_offering SET ram_size='128', speed='128' WHERE vm_type='elasticloadbalancervm';
UPDATE cloud.service_offering SET ram_size='128', speed='128' WHERE vm_type='secondarystoragevm';
UPDATE cloud.service_offering SET ram_size='128', speed='128' WHERE vm_type='internalloadbalancervm';
UPDATE cloud.service_offering SET ram_size='128', speed='128' WHERE vm_type='consoleproxy';
UPDATE cloud.vm_template SET removed=now() WHERE id='2';
UPDATE cloud.vm_template SET url='http://192.168.56.11/centos56-x86_64.vhd.bz2' WHERE unique_name='centos56-x86_64-xen';
quit
service cloudstack-management restart
To enable access to the Un-Authenticated API which we have enabled on the default port of 8096, we need to add a firewall rule. Run the following commands to allow port 8096 through the firewall
sed -i -e "/:OUTPUT/ a\-A INPUT -p tcp -m tcp --dport 8096 -j ACCEPT" /etc/sysconfig/iptables
service iptables restart
Test the UI
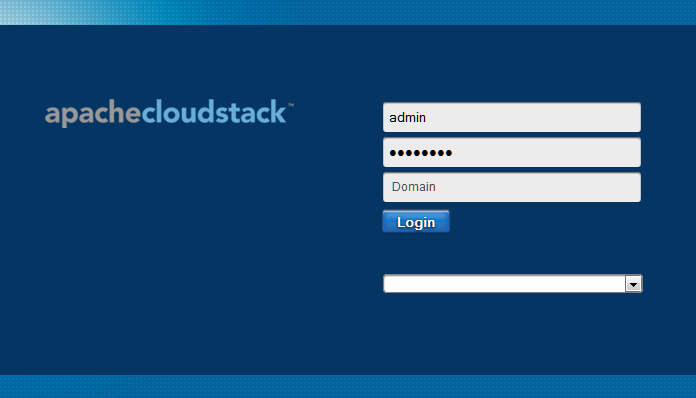
Allow 1-2 mins for the cloudstack-management service to fully restart then login into the UI which should be accessible from the Host Laptop on http://192.168.56.11:8080/client/
The default credentials are
Username: admin
Password: password
Domain: <blank>
Create Compute Offering
The default Compute Offerings are not suitable for this limited environment so we need to create a new compute offering using the following settings:
Name: Ultra Tiny
Description: Ultra Tiny – 1vCPU, 128MB RAM
Storage Type: Shared
Custom: No
# of CPU Cores: 1
CPU (in MHz): 500
Memory (in MB): 128
Network Rate (Mb/s): null
QoS Type: null
Offer HA: Yes
Storage Tags: null
Host Tags: null
CPU Cap: No
Public: Yes
Volatile: No
Deployment Planner: null
Planner mode: null
GPU: null
Reduce the amount of RAM
Following a successful login to the UI, the Databases will be fully deployed so now we can reduce the RAM to 1GB to free up memory for our XenServer VM. Shutdown the VM and change the settings to 1024 MB of RAM.
XenServer VM
To configure the XenServer you will need XenCenter running on your local Host if you are running Windows, but if your Host is running OSX or Linux, then you need to add a Windows VM which can run XenCenter. You can download XenCenter from http://downloadns.citrix.com.edgesuite.net/akdlm/8160/XenServer-6.2.0-XenCenter.msi
Create a VM for XenServer using the following settings:
Name: XenServer
Type: Linux
Version: Red Hat (64 bit)
vCPU: 2
RAM: 1536 (If your host has 8GB of RAM, consider allocating 3072)
Hard Drive: VDI – Dynamic – 24 GB
Note: VirtualBox seems to mix up the networks if you add them all at the same time so we add the 1st Network and install XenServer, then once fully installed, we add the additional networks, rebooting in-between. This appears to be a bug in the latest versions of VirtualBox (4.3.18 at the time of writing)
Modify the settings and assign ONLY the 1st network Adapter correct networks as follows:
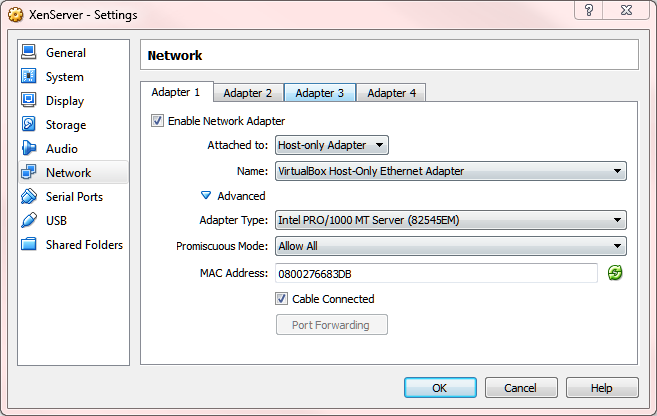
Note how we have set the ‘Promiscuous Mode’ to ‘Allow All’
Now install XenServer 6.2 by downloading the ISO from http://downloadns.citrix.com.edgesuite.net/akdlm/8159/XenServer-6.2.0-install-cd.iso and booting the VM.
The XenServer installation wizard is straightforward, but you will get a warning about the lack of hardware virtualisation support, this is expected as VirtualBox does not support this. Accept the warning and continue.
Choose the appropriate regional settings and enter the following details when prompted: (we enter the IP of the CSMAN VM for DNS and NTP, whilst this guide does not cover setting up these services on the CSMAN VM, this gives you the option of doing so at a later date)
Enable Thin Provisioning: Yes
Install source: Local media
Supplemental Packs: No
Verification: Skip
Password: <password>
Static IP: 192.168.56.101/24 (no gateway required)
Hostname: xenserver
DNS: 192.168.56.11
NTP: 192.168.56.11
Once the XenServer Installation has finished, detach the ISO and reboot the VM.
We now need to change the amount of RAM allocated to Dom0 to its minimum recommended amount which is 400MB, we do this by running the following command on the XenServer console
/opt/xensource/libexec/xen-cmdline --set-xen dom0_mem=400M,max:400M
XenServer Patches
It’s important to install XenServer Patches and whilst XenCenter will inform you of the required patches, as we are using the OpenSource version of XenServer we have to install Patches via the command line. Fortunately there are a number of ways of automating this process.
Personally I always use PXE to deploy XenServer and the installation of patches is built into my deployment process. However that is out of scope for this article, but Tim Mackey has produced a great blog article on how to do this: http://xenserver.org/discuss-virtualization/virtualization-blog/entry/patching-xenserver-at-scale.html
Whilst Tim’s method of rebooting after every patch install is best practice, it can take a long time to install all Patches so an alternative approach I use in these non-production test environments is detailed here https://github.com/amesserl/xs_patcher This installs all patches and requires only a single reboot.
The configuration file ‘clearwater’ is now a little out of date, and should contain the following (and the cache folder should contain the associated patch files):
XS62E014|78251ea4-e4e7-4d72-85bd-b22bc137e20b|downloadns.citrix.com.edgesuite.net/8736/XS62E014.zip|support.citrix.com/article/CTX140052
XS62ESP1|0850b186-4d47-11e3-a720-001b2151a503|downloadns.citrix.com.edgesuite.net/8707/XS62ESP1.zip|support.citrix.com/article/CTX139788
XS62ESP1003|c208dc56-36c2-4e91-b8d7-0246575b1828|downloadns.citrix.com.edgesuite.net/9031/XS62ESP1003.zip|support.citrix.com/article/CTX140416
XS62ESP1005|1c952800-c030-481c-a0c1-d1b45aa19fcc|downloadns.citrix.com.edgesuite.net/9058/XS62ESP1005.zip|support.citrix.com/article/CTX140553
XS62ESP1009|a24d94e1-326b-4eaa-8611-548a1b5f8bd5|downloadns.citrix.com.edgesuite.net/9617/XS62ESP1009.zip|support.citrix.com/article/CTX141191
XS62ESP1013|b22d6335-823d-43a6-ba26-28793717125b|downloadns.citrix.com.edgesuite.net/9703/XS62ESP1013.zip|support.citrix.com/article/CTX141480
XS62ESP1014|4fc82e62-b938-407d-a2c6-68c8922f3ec2|downloadns.citrix.com.edgesuite.net/9708/XS62ESP1014.zip|support.citrix.com/article/CTX141486
Once you have your XenServer fully patched shut it down and then add the 2nd Adapter, again note how we have set the ‘Promiscuous Mode’ to ‘Allow All’
Boot the VM and then using XenCenter perform a ‘Rescan’ on the NICs to detect this new NIC, then shutdown and add the 3rd Adapter, again note how we have set the ‘Promiscuous Mode’ to ‘Allow All’
Boot the VM and then using XenCenter perform a ‘Rescan’ on the NICs to detect this new NIC, then shutdown and add the 4th Adapter, again note how we have set the ‘Promiscuous Mode’ to ‘Allow All’
Boot the VM and then using XenCenter perform a ‘Rescan’ on the NICs to detect this final NIC, then one final reboot to make sure they are all activated and connected.
Configure XenServer Networks
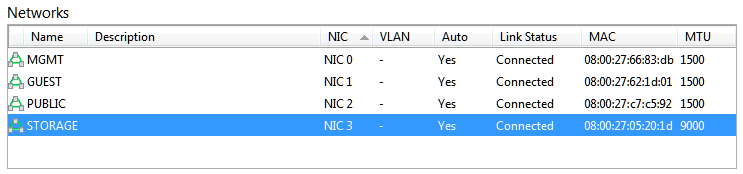
Now we are ready to configure the XenServer Networks. We should have the following four networks present, and it’s worth just checking the MACs line up with the Adapters in VirtualBox.
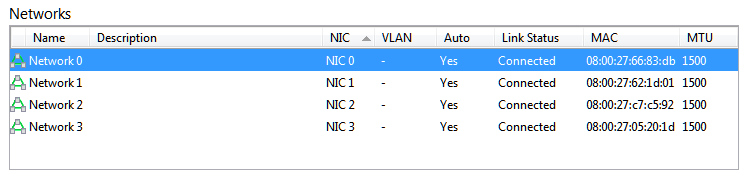
We need to rename the networks using a more logical naming convention, and also create the two Storage Networks, and assign their VLANs etc.
First of all start by renaming them all setting the MTU of the Storage Network to 9000 (the rest remain at the default of 1500)
Network 0 – MGMT
Network 1 – GUEST
Network 2 – PUBLIC
Network 3 – STORAGE (and MTU of 9000)
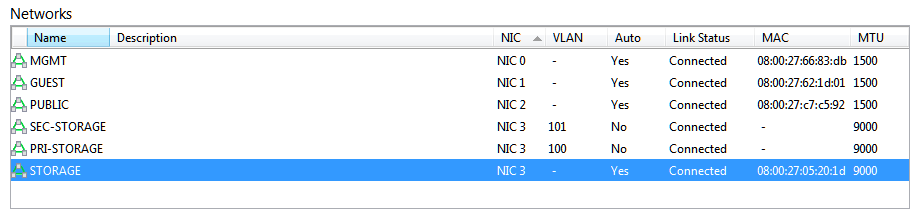
Next we add the Primary Storage Network using the following settings:
Type: External Network
Name: PRI-STORAGE
NIC: NIC 3
VLAN: 100
MTU: 9000
Then the Secondary Storage Network:
Type: External Network
Name: SEC-STORAGE
NIC: NIC 3
VLAN: 101
MTU: 9000
Finally we add the IP addresses for the Primary and Secondary Storage Networks so the XenServer can access them
Name: PRI-STOR
Network: PRI-STORAGE
IP address: 10.10.100.101
Subnet mask: 255.255.255.0
Gateway: <blank>
Name: SEC-STOR
Network: SEC-STORAGE
IP address: 10.10.101.101
Subnet mask: 255.255.255.0
Gateway: <blank>

That is all the configuration required for XenServer so now we can proceed with deploying our first Zone. However before we do, it’s worth taking a snapshot of both of the VMs so you can roll back and start again if required.
Zone Deployment
We now add an Advanced Zone by going to ‘Infrastructure/Zones/Add Zone’ and creating a new Zone of type ‘Advanced’ without Security Groups
Zone Name – Test
IPv4 DNS1 – 8.8.8.8
Internal DNS 1 – 192.168.56.11
Hypervisor – XenServer
Guest CIDR – 10.1.1.0/24
Next we need to setup the XenServer Traffic Labels to match the names we allocated to each Network on our XenServer, and we also need to add the optional Storage Network by dragging it onto the Physical Network.

Edit each Traffic Type and set the following Labels:
Management Network – MGMT
Public Network – PUBLIC
Guest Network – GUEST
Storage Network – SEC-STORAGE
Then continue through the add zone wizard using the following settings
Public Traffic
Gateway – 172.30.0.1
Netmask – 255.255.255.0
VLAN – <blank>
Start IP – 172.30.0.21
End IP -172.30.0.30
POD Settings
POD Name – POD1
Reserved System Gateway – 192.168.56.1
Reserved System Netmask – 255.255.255.0
Start Reserved System IP – 192.168.56.21
End Reserved System IP – 192.168.56.30
Guest Traffic
VLAN Range – 600 – 699
Storage Traffic
Gateway – 10.10.101.1
Netmask – 255.255.255.0
VLAN – <blank>
Start IP – 10.10.101.21
End IP – 10.10.101.30
Cluster Settings
Hypervisor – XenServer
Cluster Name – CLU1
Host Settings
Host Name – 192.168.56.101
Username – root
Password – <password>
Primary Storage Settings
Name – PRI1
Scope – Cluster
Protocol – nfs
Server – 10.10.100.11
Path – /exports/primary
Provider: DefaultPrimary
Storage Tags: <BLANK>
Secondary Storage Settings
Provider – NFS
Name – SEC1
Server – 10.10.101.11
Path – /exports/secondary
At the end of it, activate the Zone, then allow approx. 5 minutes for the System VMs to deploy and the default CentOS Template to be ‘downloaded’ into the system. You are now ready to deploy your first Guest VM.
Away from work, Steve is a music lover and semi-professional musician. Although he doesn’t speak at many technology conferences, he can sometimes be heard providing the evening entertainment.
