In the previous article we covered some basics around Ceph and deployed a working Ceph cluster. In this article, we are going to finish the Ceph configuration needed for CloudStack and add it as a new Primary Storage pool. We are also going to deploy Ceph volumes via CloudStack and examine them. Finally, in part 3 (to be published soon), I will show you some examples of working with RBD images and will cover some Ceph specifics, both in general and related to the CloudStack.
Before proceeding with the actual work, let me first mention that CloudStack supports Ceph with KVM only, so most of the work we do below is KVM related. Let’s define the high-level steps to be done:
- Create a dedicated RBD pool for CloudStack in which all RBD images (volumes) will be created
- Create a dedicated authentication key for the previously created pool
- Update / install required Ceph binaries on KVM nodes
- Add Ceph as Primary Storage in CloudStack
- Implement custom storage tag for Ceph Primary Storage
- Create new Compute / Disk offerings with same storage tag in order to target Ceph
From any Ceph node…
Ceph groups RBD (RADOS block device) images in pools and manages authentication on a per pool level. Each image is collection of many RADOS objects, with each object having a default size of 4MB (configurable per image). At this moment we have no pools created. But before creating a pool, let’s go through some basics around the different kind of pools in Ceph.
There are 2 kind of pools, based on the way the objects are stored across cluster:
- Replicated – makes sure that there are always total of N replicas/copies of an object
- Erasure Coding – simplest way to think of this is a network RAID 5/6
Replicated pools are used for better performance at the expense of space consumption, and you can think of it as a network-based RAID 1, where we have n number of replicas of an object. On the other hand, erasure coding pools are usually used when using Ceph for S3 Object Storage purposes and for more space efficient storage where bigger latency and lower performance is acceptable, since it is similar to RAID 5 or RAID 6 (requires some computation power). Here, for example, we may have 4 chunks of actual data and 2 parity chunks (EC 4+2), with just 50% of space overhead, while (depending on the setup), we can still survive losing a Ceph node or even two.
So, let’s create a dedicated pool for CloudStack, set its replica size and finally initialize it:
ceph osd pool create cloudstack 64 replicated
ceph osd pool set cloudstack size 3
rbd pool init cloudstack
The commands above will create a replicated pool named “cloudstack” with total of 64 placement groups (more info on placement groups here) with a replica size of 3, which is recommended for a production cluster. Optionally, you can set replica size of 2 during testing, for somewhat increased performance and less space consumed on the cluster.
Next, let’s generate a dedicated authentication key for our CloudStack pool:
ceph auth get-or-create client.cloudstack mon 'profile rbd' osd 'profile rbd pool=cloudstack'
The command above will output a key to STDOUT only – please save the given key, since we will use it when adding Ceph to CloudStack later:
[client.cloudstack]
key = AQAFSZpc0t+BIBAAO95rOl+jgRwuOopojEtr/g==
Now that the pool for CloudStack is ready, we need to prepare KVM nodes with proper Ceph binaries as well as the write-back caching configuration.
From the Ceph admin node…
Starting from Centos 7.2 (and Ubuntu 14.04), libvirt / QEMU comes by default with support for RBD, so there’s no need to compile the binaries yourself. That being said, if we check KVM nodes with “rpm -qa | grep librbd1″ it will return an existing versions of ‘librbd1” package (version 10.2.5 in my case) already installed, but most certainly it will not be the current version that corresponds to the cluster version we just installed (13.2.5 in this case). For the record, librbd is a user space Ceph client, to which the qemu / libvirt talks effectively.
Furthermore, if we run command “ceph features” from any Ceph node, it will return (in our fresh Mimic cluster) “luminous” as the minimum compatible release version for the client – that means that our Ceph client (librbd) needs to be of a minimum of “luminous” version (which translates to 12.2.0), but our current librbd version is 10.2.5 – so let’s upgrade it to same Mimic versions as the version of our cluster:
ceph-deploy install --cli kvm1 kvm2
The command above will add Mimic repo to my two KVM nodes and install only the cli binaries (“ceph-common” package). This will also trigger the upgrade of existing “librbd1” package to the correct version. In addition, please make sure that name resolution of the KVM nodes works from the Ceph admin node.
Optionally, if you don’t want to install Ceph cli tools on KVM nodes, you can just upgrade the “librbd1” package while having previously created a proper Ceph Mimic repository on each KVM node (i.e. clone repo file from any Ceph cluster node).
Some of you might want to be able to manage Ceph cluster from KVM nodes as well (beside being able to manage it from Ceph nodes) and to be able to interact with RBD images with via “rbd” or “qemu-img“ tools – in this case we need this “rbd” tool installed on KVM nodes (part of “ceph-common” package, already installed in previous step), then we need ceph.conf locally on KVM nodes in order for the “rbd” tool to know how to connect to cluster, which MONs to target, etc. and finally we need the admin authentication key – this is the file “ceph.client.admin.keyring” which was created on our Ceph admin node when we created our cluster initially (in folder /root/CEPH-CLUSTER, as mentioned in Part 1 of this article series).
Additionally, if we want to use qemu-img tool to examine RBD images, we can either have qemu-img installed on the Ceph cluster nodes or we have to provide the above mentioned ceph.conf and admin keys in their default location (/etc/ceph/) on the KVM nodes, where librbd (client) will pick them up automatically, so we don’t need to specify MON IP/URL and admin key on the command line.
If you don’t want to be able to manage your Ceph cluster from KVM nodes, simply don’t copy over the “ceph.client.admin.keyring” file to KVM nodes. The ceph.conf file is still a must due to RBD caching as explained later. I have decided to make my KVM nodes happy by providing them with ceph.conf and admin keys, as below:
ceph-deploy admin kvm1 kvm2
The command above will effectively just copy ceph.conf and ceph.client.admin.keyring files to /etc/ceph/ folder on KVM nodes. Actually, you can still operate RBD images and manage your cluster from KVM nodes even if you don’t have ceph.conf and admin key present locally – you can always pass required parameters on the command line to “rbd” or “qemu-img” tools, as shown later.
RBD caching
After we have pushed the ceph.conf file to KVM nodes, librbd will read it for any configuration directives under the “[client]” section of that file (beside the other sections), but that section is missing at this moment!
Before we proceed into configuring the RBD caching, let me do here a copy/paste from the original docs that is important to understand regarding RBD caching:
” The user space implementation of the Ceph block device (i.e., librbd) cannot take advantage of the Linux page cache, so it includes its own in-memory caching, called “RBD caching.” RBD caching behaves just like well-behaved hard disk caching. When the OS sends a barrier or a flush request, all dirty data is written to the OSDs. This means that using write-back caching is just as safe as using a well-behaved physical hard disk with a VM that properly sends flushes (i.e. Linux kernel >= 2.6.32). The cache uses a Least Recently Used (LRU) algorithm, and in write-back mode it can coalesce contiguous requests for better throughput. “
After digesting the above info, we can proceed into a brief configuration of caching. We can either fix it manually on each KVM node by adding the missing section in ceph.conf file, or we can do it in a more proper way by changing ceph.conf on the Ceph admin node and then pushing new file version to all KVM (and optionally Ceph cluster) nodes:
cat << EOM >> /root/CEPH-CLUSTER/ceph.conf
[client]
  rbd cache = true
  rbd cache writethrough until flush = true
EOM

ceph-deploy --overwrite-conf admin kvm1 kvm2
Please note the above “writethrough until flush = true”. This is a safety mechanism which will force writethrough cache mode until it receives the very first flush request from the VM OS (which means that the OS is sending proper flush requests to the underlying storage, i.e. kernel >= 2.6.32) and then cache mode will change to the write-back, which actually brings performance benefits.
If case you want to play more with RBD caching, please see here – where you can find some important default values which we didn’t explicitly configure i.e. default rbd cache size is 32 MB (this is per volume) – so in case of 50 VMs with 4 volumes each, that translates to 50 x 4 x 32MB = 6.4GB of additional RAM consumed on a KVM host – keep that in mind !
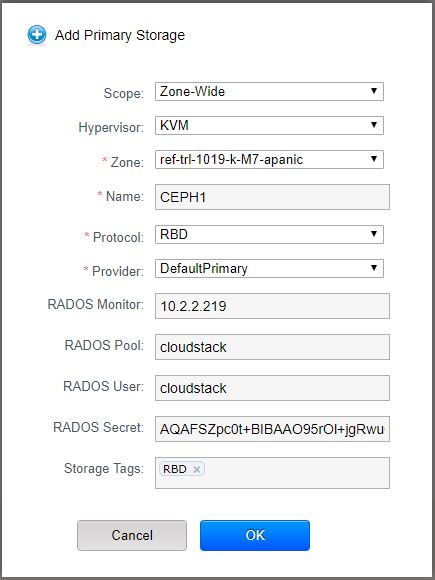
Finally, let’s add the Ceph to CloudStack as an additional Primary Storage – we can do it via GUI or optionally via CloudMonkey (API) as following:
Or via CloudMonkey:
create storagepool scope=zone zoneid=3c764ee1-6590-417d-b873-f073d0c550be hypervisor=KVM name=MyCephCluster provider=Defaultprimary url=rbd://cloudstack:AQAFSZpc0t-BIBAAO95rOl+jgRwuOopojEtr_g==@10.2.2.219/cloudstack tags=RBD
Most of the parameters are self-explanatory but let’s explain a few of them:
- RADOS Monitor: This is the IP address (or DNS name) of the Ceph Monitor (MON) instance – in my case I have defined a very first MON instance (IP address of the Ceph1 node from my cluster) – but in production environment you will want to have an internal Round Robin DNS setup on some internal DNS server (i.e. single zone on Bind) – such that KVM nodes will resolve the ULR (i.e. mon.myceph.cluster) in a round robin fashion to multiple MON instances – this is the way to achieve high availability of Ceph MONs, though some manual DNS zone changes are needed in case of prolonged MON maintenance
- RADOS Pool: This is the pool “cloudstack” which we created in the beginning of the article
- RADOS User and RADOS Secret: This are the values from the authentication key which we generated in the beginning of the article, shown below again for your convenience
[client.cloudstack]
key = AQAFSZpc0t+BIBAAO95rOl+jgRwuOopojEtr/g==
The above command, used to add Ceph to CloudStack, will effectively do a few things:
- On each KVM node, it will create a new storage pool in libvirt
- The storage pool definition files (xml and the secret) will be written to /etc/libvirt/secrets/ folder as shown below
- Every time CloudStack Agent is restarted, it will recreate the Ceph storage pool (even if you manually remove the files below)
[root@kvm1]# cat /etc/libvirt/secrets/ef9cfd17-abe1-343d-97a0-cee6c71a6dad.xml
<secret ephemeral='no' private='no'>
  <uuid>ef9cfd17-abe1-343d-97a0-cee6c71a6dad</uuid>
  <usage type='ceph'>
    <name>cloudstack@ceph1.local:6789/cloudstack</name>
  </usage>
</secret>

[root@kvm1]# cat /etc/libvirt/secrets/ef9cfd17-abe1-343d-97a0-cee6c71a6dad.base64
AQAFSZpc0t+BIBAAO95rOl+jgRwuOopojEtr/g==
If we check the libvirt pool created above, we can see that it’s not persistent and it doesn’t start automatically – i.e. when you restart libvirt alone, it will not recreate / start the Ceph storage pool in libvirt– the CloudStack agent is the one doing this for us:
virsh # pool-info ef9cfd17-abe1-343d-97a0-cee6c71a6dad
Name:           ef9cfd17-abe1-343d-97a0-cee6c71a6dad
UUID:           ef9cfd17-abe1-343d-97a0-cee6c71a6dad
State:          running
Persistent:     no
Autostart:      no
Capacity:       299.99 GiB
Allocation:     68.19 MiB
Available:      286.02 GiB
Note that in the example above, I was actually using DNS name for the Ceph MON (ceph1.local) instead of the IP – Ceph MON’s DNS name is resolved to IP both when you add Ceph to CloudStack and every time you start a VM or attach new volume, etc. – so DNS resolution needs to be fast and stable here.
Now that we added Ceph to CloudStack, let’s create a Data disk offering with tag “RBD” – this will make sure that any new volume from this offering is created on storage pool with tag “RBD” – which is Ceph in our case . Here, we are using storage tags to avoid messing up with your existing CloudStack installation – but it’s not required otherwise:
(localcloud) SBCM5> > create diskoffering name=5GB-Ceph displaytext=5GB-Ceph storagetype=shared provisioningtype=thin customized=false disksize=5 tags=RBD
{
  "diskoffering": {
    "created": "2019-03-26T19:27:32+0000",
    "disksize": 5,
    "displayoffering": true,
    "displaytext": "5GB-Ceph",
    "id": "2c74becc-c39d-4aa8-beec-195b351bdaf0",
    "iscustomized": false,
    "name": "5GB-Ceph",
    "provisioningtype": "thin",
    "storagetype": "shared",
    "tags": "RBD"
  }
}
Note the offering ID from above (2c74becc-c39d-4aa8-beec-195b351bdaf0) – and let’s create a disk from it:
(localcloud) SBCM5> > create volume diskofferingid=2c74becc-c39d-4aa8-beec-195b351bdaf0 name=MyFirstCephDisk zoneid=3c764ee1-6590-417d-b873-f073d0c550be
{
  "volume": {
    "account": "admin",
    "created": "2019-03-26T19:52:05+0000",
    "destroyed": false,
    "diskofferingdisplaytext": "5GB-Ceph",
    "diskofferingid": "2c74becc-c39d-4aa8-beec-195b351bdaf0",
    "diskofferingname": "5GB-Ceph",
    "displayvolume": true,
    "domain": "ROOT",
    "domainid": "401ce404-44c1-11e9-96c5-1e009001076e",
    "hypervisor": "None",
    "id": "47b1cfe5-6bab-4506-87b6-d85b77d9b69c",
    "isextractable": true,
    "jobid": "49a682ab-42f9-4974-8e42-452a13c97553",
    "jobstatus": 0,
    "name": "MyFirstCephDisk",
    "provisioningtype": "thin",
    "quiescevm": false,
    "size": 5368709120,
    "state": "Allocated",
    "storagetype": "shared",
    "tags": [],
    "type": "DATADISK",
    "zoneid": "3c764ee1-6590-417d-b873-f073d0c550be",
    "zonename": "ref-trl-1019-k-M7-apanic"
  }
}
Finally, since volume creation is a lazy provisioning process (i.e. volume is created in DB only, not really on storage pool), let’s attach the disk to a running VM (using volume ID “47b1cfe5-6bab-4506-87b6-d85b77d9b69c” from previous command output), which will trigger the actual disk creation on our Ceph cluster (output shortened for brevity):
(localcloud) SBCM5> > attach volume id=47b1cfe5-6bab-4506-87b6-d85b77d9b69c virtualmachineid=19a67e20-c747-43bb-b149-c2b2294002f9
{
  "volume": {
    …
    "jobstatus": 0,
    "name": "MyFirstCephDisk",
    "path": "47b1cfe5-6bab-4506-87b6-d85b77d9b69c",
    …  }
}
Note the “path” output field (which is usually the same as the ID of the volume, except in some special cases) – and let’s check our Ceph cluster if we can find this volume and check it’s properties.
From any KVM node…
[root@kvm1 ~]# rbd ls -p cloudstack
47b1cfe5-6bab-4506-87b6-d85b77d9b69c

[root@kvm1 ~]# rbd info cloudstack/47b1cfe5-6bab-4506-87b6-d85b77d9b69c
rbd image '47b1cfe5-6bab-4506-87b6-d85b77d9b69c':
        size 5 GiB in 1280 objects
        order 22 (4 MiB objects)
        id: d43b4c04a8af
        block_name_prefix: rbd_data.d43b4c04a8af
        format: 2
        features: layering, exclusive-lock, object-map, fast-diff, deep-flatten
        op_features:
        flags:
        create_timestamp: Tue Mar 28 19:46:32 2019
We can also examine the Ceph RBD image with qemu-img tool:
[root@kvm1 ~]# qemu-img info rbd:cloudstack/47b1cfe5-6bab-4506-87b6-d85b77d9b69c
image: rbd:cloudstack/47b1cfe5-6bab-4506-87b6-d85b77d9b69c
file format: raw
virtual size: 5.0G (5368709120 bytes)
disk size: unavailable
As you can see in qemu-img command above, we did not specify any username and authentication keys, because we have our ceph.conf and the admin key files present in /etc/ceph/ folder. If you decided to opt-out of having these 2 files present on KMV nodes, you will have to use a cumbersome command as below:
qemu-img info rbd:cloudstack/47b1cfe5-6bab-4506-87b6-d85b77d9b69c:mon_host=10.2.2.219:auth_supported=Cephx:id=cloudstack:key=AQAFSZpc0t+BIBAAO95rOl+jgRwuOopojEtr/g==
In the above command we are specifying the MON IP address, username and key for authentication.
Now that you got the basics of consuming Ceph from CloudStack, feel free to also create Compute Offerings and System Offerings for Virtual Routers, Secondary Storage VM, Console Proxy VM and experiment with volume migration from i.e. NFS to Ceph. Be sure to have storage tags under control.
I hope that this article series has been interesting so far. In part 3 (which will be the final part), I will show you some examples of working with RBD images and will cover some Ceph specifics, both in general and related to CloudStack.
Andrija Panic is a Cloud Architect at ShapeBlue and a PMC member of Apache CloudStack. With almost 20 years in the IT industry and over 12 years of intimate work with CloudStack, Andrija has helped some of the largest, worldwide organizations build their clouds, migrate from commercial forks of CloudStack, and has provided consulting and support to a range of public, private, and government cloud providers across the US, EMEA, and Japan. Away from work, he enjoys spending time with his daughters, riding his bike, and tries to avoid adrenaline-filled activities.
You can learn more about Andrija and his background by reading his Meet The Team blog.