The Apache CloudStack community recently released CloudMonkey 5.2.0. In this post, Rohit Yadav Software Architect at ShapeBlue talks about this release and his work on the new server profile feature. For more information on CloudMonkey and its usage click here.
At ShapeBlue we offer CloudStack infrastructure support and in doing so we rely heavily on tools such as CloudMonkey which is the official Apache CloudStack command line interface and client. CloudMonkey allows us to quickly slice and dice API outputs, and to find the issue without using the CloudStack web UI.
We use CloudMonkey to interact with different CloudStack deployments but, prior to this release, every time we needed to interact with a new management server, we had to change the management server related options and user credentials. So we wanted to solve this problem with server profiles. With this motivation, I started a discussion thread on the CloudStack dev mailing list to work on the next CloudMonkey release and asked for any feature or improvements the users and admins would want to have in the next release, and one of the community members, Lucian, suggested this feature as well.
So, we implemented support for multiple server profiles in CloudMonkey that would allow a user to toggle between multiple server specific configurations using a single command while having different servers configurations stored in the same CloudMonkey configuration file in separate sections. The latest release of CloudMonkey 5.2.0 was shipped with this feature among other improvements and bugfixes.
Using CloudMonkey 5.2.0
To get started, install python and pip, then install CloudMonkey:
$ pip install cloudmonkey
If you’re an existing user, please upgrade CloudMonkey:
$ pip install --upgrade cloudmonkey
Now, launch CloudMonkey and you’ll see something like the following:
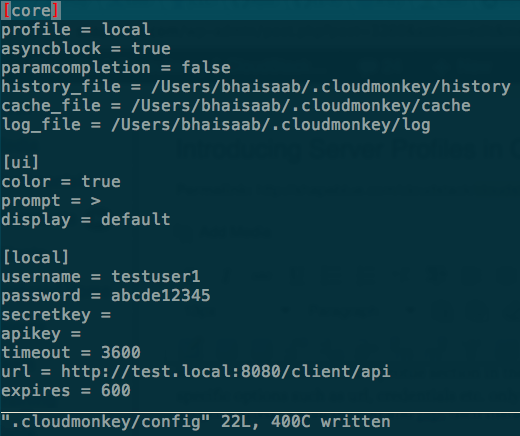
If no “profile” is found in the config, CloudMonkey creates and uses a default profile by the name “local” with default values. To create a server profile, you run a “set profile ” command which creates a new section profile section in the config file with the given name and sets default values for other options such as url, username, password etc. If a profile already exists with provided name, it’s simply loaded from the configuration file. Any “set” command for options such as url, username, password, apikey, secretkey etc. will set these options only on the current server profile. The following screenshot illustrates the default server profile “[local]” in the CloudMonkey config:
Hope you’ll find the latest release of CloudMonkey and this feature useful!
About the author
Rohit Yadav is a Software Architect at ShapeBlue and an Apache CloudStack committer. He is the author and maintainer of CloudMonkey, and has contributed and worked on various parts of CloudStack such as API layer, authentication, database, accounts, KVM, virtual router, systemvms, maven build system. He was also behind DevCloud2, API discovery service, and developed methods to build and export systemvms using VirtualBox.
Rohit Yadav oversees the Software Engineering function at ShapeBlue, providing leadership and mentorship to our ever-growing Engineering Team. He has been a PMC member of the project since 2015. Rohit is the author & maintainer of the CloudStack CloudMonkey project and has been instrumental in the development of many of CloudStack’s flagship features. Rohit regularly speaks at events, focussing on developer access to the project, and has also mentored Google Summer of Code students.


