 Vendors of virtual appliances (vApp) for VMware often produce ‘templates’ of their appliances in an OVA format. An OVA file will contain disc images, configuration data of the virtual appliance, and sometimes a EULA which must be acknowledged.
The purpose of this feature is to enable CloudStack to mimic the end-user experience of importing such an OVA directly into vCenter, the end result being a virtual appliance deployed with the same configuration data in the virtual machines descriptor (VMX) file as would be there if the appliance had been deployed directly through vCenter.
The OVA will contain configuration data regarding both hardware parameters required to start a virtual appliance, and software parameters which the virtual appliance will be able to read during instantiation. Generally, the software parameters will take the form of questions posed to the end-user, the answer to which is passed to the virtual appliance. Hardware parameters may either be set as a result of a question to the end-user (i.e. “Would you like a small, medium, or large appliance?”), or they may be passed directly into the virtual machines descriptor (VMX) file.
CloudStack version 4.15 includes full support for vApp OVA templates. Users will be able to deploy vApps in CloudStack, resulting in an appliance deployed with the same configuration data as if the VM has been deployed directly through vCenter.
Glossary:
The following terms will be used throughout this blog:
- Workflow: The VM deployment cycle procedure / tasks on CloudStack for VMware environments.
- ‘Deploy-as-is’: A new workflow / paradigm in which the deployed VMs inherit all the pre-set configurations and information from the template. In other words, ‘deploy-as-is VMs’ are clones of the templates from which they are deployed.
- ‘Non-deploy-as-is’: The usual workflow on CloudStack for VMware environments prior to version 4.15.
High-level CloudStack VMware workflow refactor:
In this section, we will deep dive on the improvements and refactor in CloudStack to support vApps – from the usual VMware workflow to the ‘deploy-as-is’ workflow.
The default behavior for templates registered from CloudStack 4.15 and onwards will be the ‘deploy-as-is’ workflow. The main difference between this and the existing workflow is that ‘deploy-as-is’ lets CloudStack simplify the VM deployment process on VMware by using the template information about guest OS, hardware version, disks, network adapters and disk controllers to generate new VMs, without much user intervention.
As a vApp template can have multiple ‘configurations’, the copy from secondary storage to primary storage must be extended:
- The ‘configuration’ ID selected by the user must be considered when copying a template from secondary to primary storage
- The same template can now have multiple “versions” in the same primary storage, as the users can select from multiple OVF ‘configurations’ from the same template.
- This is reflected on a new column ‘deployment_option’ in the table ‘template_spool_ref’
Prior to version 4.15, these were the steps involved in VMware VM deployment:
- Deploy OVF template from Secondary to Primary storage into a ‘template VM’
- Create the VM ROOT disk:
- Clone the template VM on Primary storage into a temporary VM
- Detach the disk
- Remove the temporary VM
- Deploy a VM from a template:
- 4.1 Create a blank VM
- Attach the ROOT disk created previously and any data disk.
As mentioned earlier, all templates registered from CloudStack 4.15 will use the improved workflow (‘deploy-as-is’). This extends but simplifies the previous workflow:
- VMs can have multiple ROOT disks (as appliances may need multiple disks to work)
- All the information set in the template is honored, and any user-specified setting such as Guest OS type, ROOT disk controller, network adapter type, boot type and boot mode are ignored.
- OVF template deployed from Secondary to Primary storage matching the configuration ID selected by the user, creating a ‘template VM’ of a specific OVF ‘configuration’ on the Primary Storage
- Create the VM ROOT disks:
- Clone the template VM on Primary storage into a final user VM
- Deploy a VM from a template (user VM exists by now): § Use the cloned VM to get its disk info, and then reconcile the disk information in database § The VM’s disk information is obtained by the SSVM, when CloudStack allocates volumes for virtual machines (allocation) in database. The SSVM uses the template ID and the selected ‘configuration’ to read the OVF file in secondary storage and retrieving the disks information.
- Attach any data disk.
When it comes to the original workflow (for templates registered before 4.15), note that the use of a blank VM means dropping all the information from the source template. As the resulting VM was not a clone of the template (except for the ROOT disk), all the information that the template contained was not considered: guest OS type, hardware version, controllers, configurations, vApp properties, etc. With the new workflow we copy all the information available from the template.
As the information is now obtained from the template itself, CloudStack no longer requires some information at the template registration time. Instead, it obtains this information directly from the OVF descriptor file, meaning there is no need to select a ROOT disk controller, network adapter type or guest OS.
Initially, the template is registered with a default guest OS ‘OVF Configured OS’ until the template is successfully installed. Once installed, the guest OS is displayed from the information set in the OVF file.
- To provide a complete list of supported guest OS, the tables ‘guest_os’ and ‘guest_os_hypervisor’ have been populated with the information from: https://code.vmware.com/apis/704/vsphere/vim.vm.GuestOsDescriptor.GuestOsIdentifier.html
- There is also no need to select BIOS or UEFI (or Legacy vs. Secure boot mode) during te VM deployment time, and no ‘hardcoding’ the VM HW / VMX version to the ‘latest supported’ by the destination ESXi host (old workflow behaviour).
- This information is obtained from the OVF file at template registration – i.e. after the template is downloaded to the secondary storage, it is extracted and the OVF file is parsed.
- All the parsed information is sent to the management server and is persisted in database (in a new table ‘template_deploy_as_is_details’)
Disclaimer
Some of this functionality was introduced in version 4.14. However, as the only supported sections were the user-configurable properties, this support was extremely limited and should not be used with vApp templates. Any templates registered prior to upgrading to or installing CloudStack version 4.15 will not support vApp templates. These templates will continue working as they were before the upgrade, following the usual workflow for VMware deployments on CloudStack.
The default behavior for templates registered from version 4.15 and onwards is the “deploy-as-is” workflow.
vApp templates format
An appliance OVA contains a descriptor file (OVF file) containing information about the appliance, organized in different sections in the OVF descriptor file. Most sections used by the appliances are not set on ‘non-deploy-as-is’ templates.
The most common sections set on appliances are:
- Virtual hardware and configurations. The appliance can provide different deployment options (configurations) where each one of them has different hardware requirements such as CPU number, CPU speed, memory, storage, networking.
- User-configurable parameters. The appliance can provide a certain number of user-configurable properties (also known as vApp properties) which are often required for the initial configuration of an appliance. It is possible to define required parameters which must be set by the user to continue with the appliance deployment.
- The license agreements. The appliance can define a certain number of license agreements which must be accepted by the user to continue with the appliance deployment.
For further information on the full OVF format and its syntax, please visit the OVF Specification Document: https://www.dmtf.org/sites/default/files/standards/documents/DSP0243_2.1.1.pdf
vCenter – Deploy a vApp from OVF
Before this feature, the only feasible way to deploy an appliance was directly through vCenter, using the ‘Deploy from OVF’ operation. However, CloudStack would not be aware of this VM and it would therefore not be managed by CloudStack. As this feature enables user to mimic the deployment experience of appliances through CloudStack, we will briefly describe the vCenter deployment experience with an example appliance containing all the sections described in the previous section (vApp templates format). Before starting the deployment of a virtual appliance, vCenter firstly displays the end-user license agreements which the user must accept before continuing with the deployment wizard:
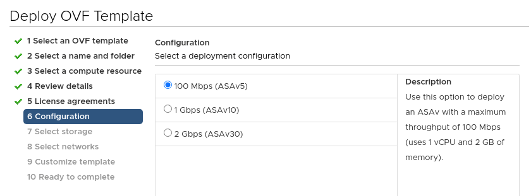
The next step displays the different configurations for the appliance and their respective hardware requirements. The user must select only one of the configurations available to proceed to the next step:
The appliances are preset with a certain number of network interfaces, which must be connected to networks (either to different networks or to the same network). Each network interface shows a name to help the user connecting the interfaces to the appropriate networks.
The last step involves setting some properties. The property input fields can be of a different type: input fields, checkboxes or dropdown menus. vCenter displays the properties and allows the user to enter the desired values:
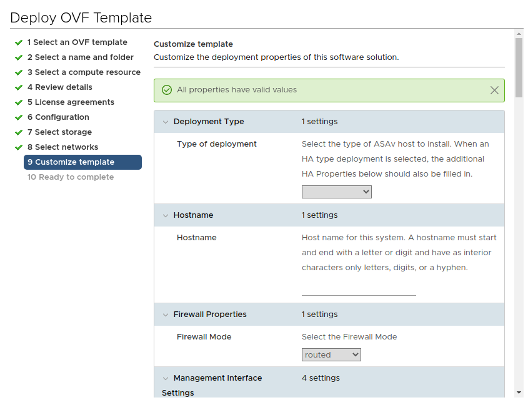
vCenter is now ready to deploy the appliance.
CloudStack – Deploy a vApp
The VM deployment wizard in CloudStack is enhanced to support deploying vApps in version 4.15. This is achieved by examining the OVF descriptor file of the ‘deploy-as-is’ templates and presenting the information that needs user input as new sections in the VM deployment wizard.
New VM deployment sections
With the new ‘deploy-as-is’ workflow, when CloudStack detects that a template contains the special sections described above, it presents them to the user in a similar way to vCenter, but in a different order, extending the existing VM deployment wizard steps.
The VM deployment wizard requires the user to select a template from which the VM must be deployed. If the selected template provides different OVF ‘configurations’, then the existing ‘Compute Offering’ step is extended. Instead of displaying the existing compute offerings to the user, CloudStack now displays a new dropdown menu showing all available configurations. The user must select one and a compatible compute offering:

When the user selects a configuration from the Configuration menu, then the list of compute offerings is filtered, displaying only the service offerings (fixed or custom) matching the minimum hardware requirements defined by the selected configuration.
In the case of custom offerings, CloudStack automatically populates the required values with all the information available from the configuration (for number of CPUs, CPU speed and memory). If CloudStack does not find information for some of these fields, then the user must provide a value.
The ‘Networks’ step is also extended, displaying all the network interfaces required by the appliance.
If the template contains user-configurable properties, then a new section ‘vApp properties’ is displayed:
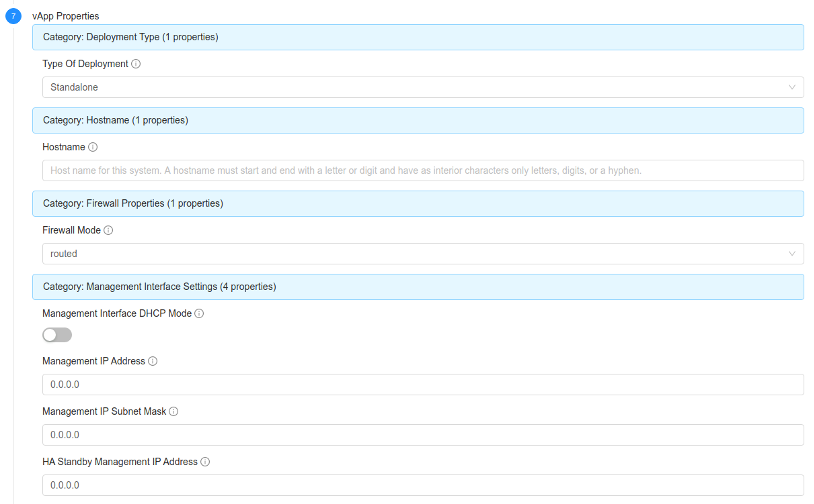
If the template contains end-user license agreements, then a new section ‘License agreements’ is displayed, and the user must accept the license agreements to finish the deployment.
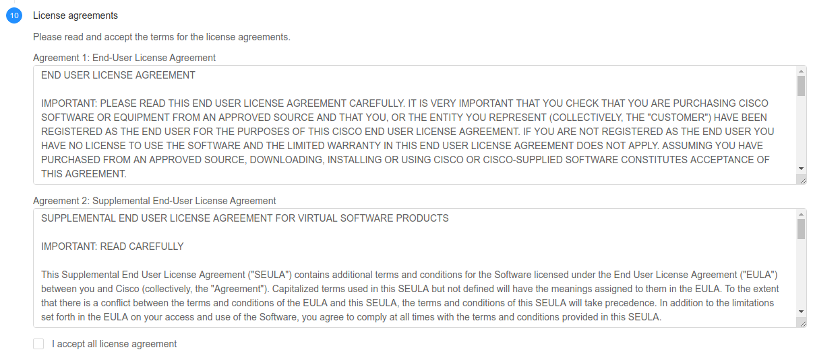
Conclusion
CloudStack version 4.15 introduces the deploy-as-is workflow for VMware environments, making it the default workflow for every new template. The previous workflow is still preserved, but only for templates registered prior to version 4.15.
Nicolas Vazquez is a Senior Software Engineer at ShapeBlue and is a PMC member of the Apache CloudStack project. He spends his time designing and implementing features in Apache CloudStack and can be seen acting as a release manager also. Nicolas is based in Uruguay and is a father of a young girl. He is a fan of sports, enjoy playing tennis and football. In his free time, he also enjoys reading and listening to economic and politics materials.
