![]() In a typical scenario prior to this feature, the administrator had to automate the process of setting hosts in maintenance before upgrading, usually using external automation tools. This feature allows administrators to perform the entire process within CloudStack, providing a flexible framework that allows defining custom scripts to execute on each host.
In a typical scenario prior to this feature, the administrator had to automate the process of setting hosts in maintenance before upgrading, usually using external automation tools. This feature allows administrators to perform the entire process within CloudStack, providing a flexible framework that allows defining custom scripts to execute on each host.
CloudStack executes these scripts within the context of 4 stages:
- Pre-flight script runs on hosts before commencing the rolling maintenance. If pre-flight check scripts return an error from any host, then rolling maintenance will be cancelled with no actions taken, and an error returned. If there are no pre-flight scripts defined on a host, then no checks will be done.
- Pre-maintenance script runs before a specific host is put into maintenance. If no pre-maintenance script is defined, then no pre-maintenance actions will be taken, and the management server will move straight to putting the host in maintenance followed by requesting that the agent runs the maintenance script.
- Maintenance script runs after a host has been put into maintenance. If no maintenance script is defined, or if the pre-flight or pre-maintenance scripts determine that no maintenance is required (exit status 70), then the host will not be put into maintenance, and the completion of the pre-maintenance scripts will signal the end of all maintenance tasks and the KVM agent will hand the host back to the management server. Once the maintenance scripts have signalled that it has completed, the host will exit maintenance mode and any ‘information’ which was collected (such as processing times) will be returned to the management server.
- Post-maintenance script is expected to perform validation after the host exits maintenance. These scripts will help to detect any problem during the maintenance process, including reboots or restarts within scripts or (for example) can mark a host as successfully processed (i.e. create a “/processed.sucessfully” file, that may be in use during the PreFlight check), in case that the rolling maintenance is run again against a whole cluster (then some hosts will be skipped due to PreFlight script determining that it should not be processed again).
If you execute the startRollingMaintenance API against a Cluster, the PreFlight.sh script(s) will be executed against all hosts sequentially, and then will be processed one by one (PreMaintenance.sh, Maintenance.sh and PostMaintenance.sh scripts are executed for that single host). Only when a single host has been fully “processed” then the execution continues and the next host is processed. Scripts can have no file extension, or can have ‘.sh’ or ‘py’ extensions, and have to be executable.
To use the feature, the agent.properties file needs to be updated (restart required) to include settings:
- maintenance.hooks.dir=/path/to/hooks/dir
- maintenance.service.executor.disabled=false/true
Once the hosts are properly configured, simply start the rolling process by invoking the ‘startRollingMaintenance’ API method (or via UI) against the Zone(s), Pod(s), Cluster(s) or Host(s).
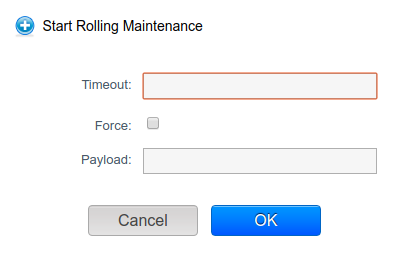
A new button ‘Start Rolling Maintenance’ is added, which opens a new dialogue invoking the startRollingMaintenance API method (all fields/parameters are optional):


If invoking the startRollingMaintenance API via GUI, keep in mind the results are not returned to the GUI (there is no querying of the job id) as it can take hours before the API / job completes. Doing the same via CLI (i.e. CloudMonkey) will return descriptive results, like in the example given below:
(localcloud) SBCM5> > start rollingmaintenance hostids=86c0b59f-89de-40db-9b30-251f851e869f
{
  "rollingmaintenance": {
    "details": "OK",
    "hostsskipped": [],
    "hostsupdated": [
      {
        "enddate": "2020-03-11'T'17:21:38+00:00",
        "hostid": "86c0b59f-89de-40db-9b30-251f851e869f",
        "hostname": "ref-trl-711-k-M7-apanic-kvm1",
        "output": "null ",
        "startdate": "2020-03-11'T'17:21:07+00:00"
      }
    ],
    "success": true
  }
}
The next example shows the output of startRollingMaintenance API when executed against 2 small ( i.e. demo) zones, with zone1 having 2 clusters with 3 hosts in each, while zone 2 having a single cluster with 3 hosts:
(localcloud) SBCM5> > start rollingmaintenance zoneids=6f3c9827-6e99-4c63-b7d5-e8f427f6dcff,ce831d12-c2df-4b11-bec9-684dcc292c18
{
  "rollingmaintenance": {
    "details": "OK",
    "hostsskipped": [],
    "hostsupdated": [
      {
        "enddate": "2020-03-12'T'12:41:24+00:00",
        "hostid": "86c0b59f-89de-40db-9b30-251f851e869f",
        "hostname": "ref-trl-711-k-M7-apanic-kvm1",
        "output": "",
        "startdate": "2020-03-12'T'12:40:44+00:00"
      },
      {
        "enddate": "2020-03-12'T'12:43:25+00:00",
        "hostid": "ef10dacd-ac4e-4ec0-bc8d-7fb5bb461c9d",
        "hostname": "ref-trl-711-k-M7-apanic-kvm2",
        "output": "",
        "startdate": "2020-03-12'T'12:41:45+00:00"
      },
      {
        "enddate": "2020-03-12'T'12:45:26+00:00",
        "hostid": "fcc8b96e-1c29-492e-a074-96babec70ecc",
        "hostname": "ref-trl-711-k-M7-apanic-kvm3",
        "output": "",
        "startdate": "2020-03-12'T'12:43:46+00:00"
      },
      {
        "enddate": "2020-03-12'T'12:47:27+00:00",
        "hostid": "4a732078-2f5d-4bf1-8425-2135004a6b1a",
        "hostname": "ref-trl-711-k-M7-apanic-kvm6",
        "output": "",
        "startdate": "2020-03-12'T'12:46:17+00:00"
      },
      {
        "enddate": "2020-03-12'T'12:49:28+00:00",
        "hostid": "8f27f11a-9c60-4c30-8622-0e1bce718adc",
        "hostname": "ref-trl-711-k-M7-apanic-kvm5",
        "output": "",
        "startdate": "2020-03-12'T'12:47:48+00:00"
      },
      {
        "enddate": "2020-03-12'T'12:51:29+00:00",
        "hostid": "adbbfc34-9369-4a15-93dc-7ed85756c24e",
        "hostname": "ref-trl-711-k-M7-apanic-kvm4",
        "output": "",
        "startdate": "2020-03-12'T'12:49:48+00:00"
      },
      {
        "enddate": "2020-03-12'T'12:53:00+00:00",
        "hostid": "59159ade-f5c3-4606-9174-e501301f59d4",
        "hostname": "ref-trl-714-k-M7-apanic-kvm3",
        "output": "",
        "startdate": "2020-03-12'T'12:52:19+00:00"
      },
      {
        "enddate": "2020-03-12'T'12:54:00+00:00",
        "hostid": "b0f54409-4874-4573-9c24-8efac5b07f6f",
        "hostname": "ref-trl-714-k-M7-apanic-kvm1",
        "output": "",
        "startdate": "2020-03-12'T'12:53:20+00:00"
      },
      {
        "enddate": "2020-03-12'T'12:55:01+00:00",
        "hostid": "02228e26-a0d6-4607-824d-501ae5ac8dab",
        "hostname": "ref-trl-714-k-M7-apanic-kvm2",
        "output": "",
        "startdate": "2020-03-12'T'12:54:21+00:00"
      }
    ],
    "success": true
  }
}
Andrija Panic is a Cloud Architect at ShapeBlue and a PMC member of Apache CloudStack. With almost 20 years in the IT industry and over 12 years of intimate work with CloudStack, Andrija has helped some of the largest, worldwide organizations build their clouds, migrate from commercial forks of CloudStack, and has provided consulting and support to a range of public, private, and government cloud providers across the US, EMEA, and Japan. Away from work, he enjoys spending time with his daughters, riding his bike, and tries to avoid adrenaline-filled activities.
You can learn more about Andrija and his background by reading his Meet The Team blog.


