Introduction
The networking in VMware environments is managed by either standard virtual switches (vSwitch) or distributed virtual switches (dvSwitch). These switches handle the traffic between Instances and the Physical Network.
A standard vSwitch needs to be created per-Host, which means that each time a Host is added to a VMware Cluster, a standard vSwitch must be created with the same name on each Host. Whenever CloudStack creates a port group within a standard vSwitch, the port group is created on each individual ESXi Host within the cluster. On the other hand, dvSwitches, which are more sophisticated, do not operate at the per-Host level, they are created from vCenter, and the administrator simply needs to add the Hosts to the dvSwitch, instead of creating switches on each of them. The use of dvSwitches can lead to more efficient network management and better performance, making it a worthwhile consideration for many VMware environments.
Migration process for a Zone
The migration process we are describing will migrate the networking of an entire CloudStack Zone from standard vSwitch to distributed vSwitch with no downtime. This approach has been tested on CloudStack version 4.18.0 with a single Zone and VMware version 7.0.3 for vSphere vCenter and ESXi Hosts. In the case of multiple Zones, the process must be repeated for each Zone.
Firstly, we must disable the Zone in CloudStack to avoid new Instance deployments and potential new port groups on the vSwitch. In the CloudStack UI, navigate to “Infrastructure” -> “Zones” -> “Select the Zone” and then click on “Disable Zone”.
We must now iterate through all the Physical Networks that are mapped to a standard vSwitch. In this example, we are using a Physical Network for the management traffic and a Physical Network for the public and guest traffic, mapped in the following way:
• Physical Network -> Management -> vSwitch0
• Physical Network -> Public Guest -> vSwitch1
For each Physical Network in the Zone, do the following:
1. Identify the vSwitch for the Physical Network. In the CloudStack Zone, click on Physical Networks, select the network and then click on Traffic types and check the VMware label. Let’s take for example the value: vSwitch1,,vmwaresvs
2. Then, we need to create a new distributed vSwitch on vCenter. In the vCenter that is mapped to the CloudStack Zone, navigate to Networking, right-click on the datacenter and click on Distributed Switch -> New Distributed Switch. Select a name for the distributed switch (for simplicity can prepend a ‘d’ to the corresponding vSwitch name from which we are migrating from, in this example can choose the name: dvSwitch1). During the dvSwitch creation, do not select the default port group creation option and select 2 as the number of uplinks.
3. We will need to use a free uplink (or remove an unused uplink from the vSwitch) to attach it to the dvSwitch. From vCenter, double-click on the dvSwitch and then click on Add and Manage Hosts. Select the option Add Hosts and select all the Hosts that need to access the dvSwitch. Then we will assign an uplink to the dvSwitch. As shown below, we are assigning the spare uplink on the Hosts to the dvSwitch

4. We need to replicate the existing port groups on the vSwitch on the new dvSwitch, keeping the same VLAN ID with a slight difference in the naming to match how CloudStack would name the port groups on a dvSwitch. For example, if an existing port group on the vSwitch is: ‘cloud.guest.1645.200.1-vSwitch1’ then we need to create a port group on the dvSwitch with the name ‘cloud.guest.1645.200.1-dvSwitch1’ and VLAN ID = 1645 (200 in this example is the Physical Network ID in CloudStack).
To automate this step, we can use PowerShell v7 and the VMware CLI module:
Install-Module VMware.PowerCLI -Scope CurrentUser
Connect-VIServer -server <VCENTER_IP>
$vswitch = “vSwitch1” (name of the vSwitch to migrate from)
$dvswitch = “dvSwitch1” (name of the created dvSwitch)
get-vmHost | Select -first 1 | get-virtualswitch -name $vswitch | get-virtualportgroup | Select name,vlanid | % { get-vdswitch $dvswitch | New-VDPortgroup -name ($_.name -replace “$vswitch”,”$dvswitch”) -vlanid $_.vlanid}
In CloudStack perform the following steps:
• Change the traffic type labels for the Physical Networks in the Zone to match the expected dvSwitch traffic type format. Example: change the existing ‘vSwitch1,,vmwaresvs’ to ‘vSwitch1,,vmwaredvs’
• For each cluster in the Zone:
a. Modify the ‘cluster_details’ table to “guestvswitchtype = vmwaredvs”
b. Perform an “Unmanage Cluster” and “Manage Cluster”
• Set the setting ‘vmware.use.dvswitch’ to ‘true’
• Enable the Zone
• Restart the management server
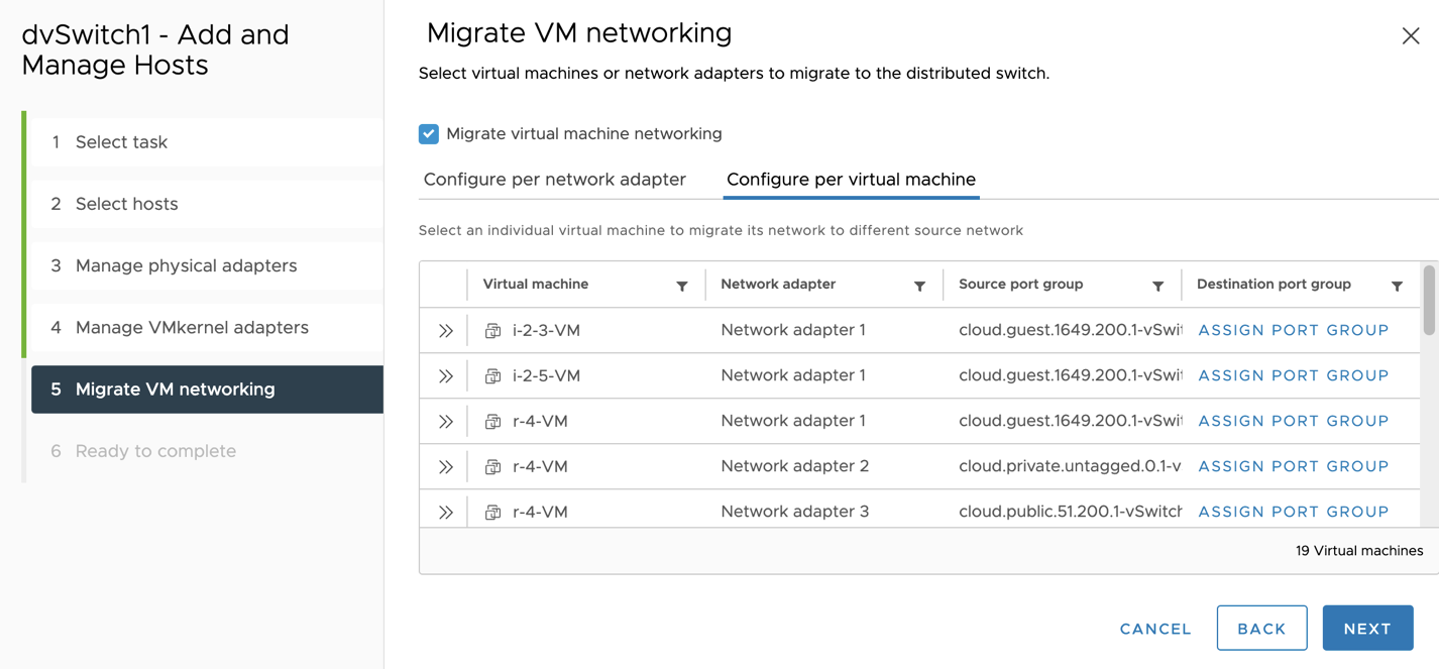
Migrate all the networks from the vSwitch port groups to the dvSwitch port groups. On vCenter, double click on the dvSwitch and click on Add and Manage Hosts. Select Manage Host networking, select all the Hosts again and then on the Migrate VM networking step click on Migrate VM networking and select the Configure per Virtual Machine tab, it will look like the image below:

On the right side of the table, need to assign the port group for each VM with the corresponding created port group on the dvSwitch.
To automate this step, we can use PowerShell v7 and the VMware CLI module:
Connect-VIServer -server <VCENTER_IP>
$vswitchA = “vSwitch0” (name of the vSwitch to migrate from (traffic A))
$dvswitchA = “dvSwitch0” (name of the created dvSwitch (traffic A))
$vswitchB = “vSwitch1” (name of the vSwitch to migrate from (traffic B))
$dvswitchB = “dvSwitch1” (name of the created dvSwitch (traffic B))
$vms = get-vm | sort des
foreach ($vm in $vms) {
Get-NetworkAdapter $vm |% {
if ($_.networkname -like “*$vswitchA*”) {
write-Host $vm.name
Set-NetworkAdapter -NetworkAdapter $_ -PortGroup (Get-vdportGroup -Name ($_.networkname -replace $vswitchA,$dvswitchA) -VDSwitch $dvswitchA) -Confirm:$false
} else if ($_.networkname -like “*$vswitchB*”) {
write-Host $vm.name
Set-NetworkAdapter -NetworkAdapter $_ -PortGroup (Get-vdportGroup -Name ($_.networkname -replace $vswitchB,$dvswitchB) -VDSwitch $dvswitchB) -Confirm:$false
}
}
}
After the migration of all the VM’s networking succeeds, the last step is the clean-up of the unused vSwitch port groups.
At the end of this process, all the existing CloudStack Zones are migrated from vSwitches to dvSwitches.
Conclusion
In this detailed guide, we’ve navigated the intricate process of migrating from vSwitch to dvSwitch in a CloudStack VMware environment. This transition, while complex, streamlines network management, reduces administrative overhead, and enhances overall network efficiency. By leveraging PowerShell scripts, we’ve automated parts of the process, making it more efficient. However, it’s crucial to monitor each step to ensure a smooth transition. Remember, the key to a successful migration lies in meticulous planning, careful execution, and thorough cleanup of unused vSwitch port groups.
Nicolas Vazquez is a Senior Software Engineer at ShapeBlue and is a PMC member of the Apache CloudStack project. He spends his time designing and implementing features in Apache CloudStack and can be seen acting as a release manager also. Nicolas is based in Uruguay and is a father of a young girl. He is a fan of sports, enjoy playing tennis and football. In his free time, he also enjoys reading and listening to economic and politics materials.


