
We have worked with Severalnines to produce what we believe is a better way.
In this blog post, we’ll show you how to deploy redundant CloudStack management servers with MariaDB Galera Cluster on CentOS 6.5 64bit. We will have two load balancer nodes fronting the management servers and the database servers. Since CloudStack relies on MySQL’s GET_LOCK and RELEASE LOCK, which are not supported by Galera, we will redirect all database requests to only one MariaDB node and automatically failover to another node in case the former goes down. So, we’re effectively getting the HA benefits of Galera clustering (auto-failover, full consistency between DB nodes, no slave lag), while avoiding the Galera limitations as we’re not concurrently accessing all the nodes. We will deploy a two-node Galera Cluster (plus an arbitrator on a separate ClusterControl node).
Our setup will look like this:
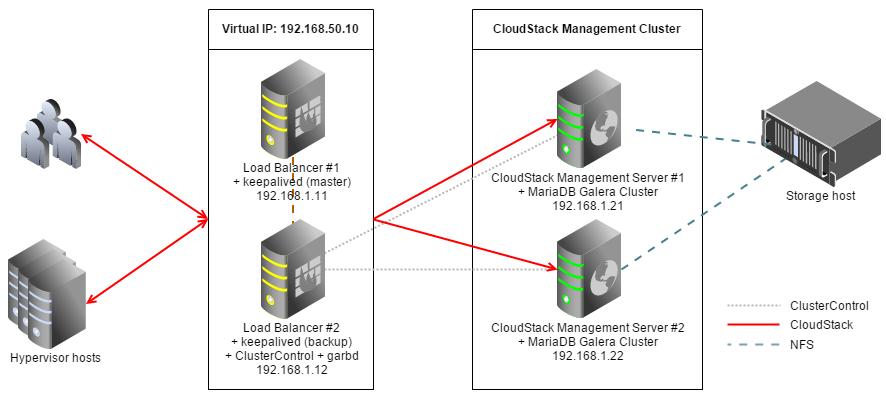
Note that this blog post does not cover the installation of hypervisor and storage hosts. Our setup consists of 4 servers:
- lb1: HAproxy + keepalived (master)
- lb2: HAproxy + keepalived (backup) + ClusterControl + garbd
- mgm1: CloudStack Management + database server
- mgm2: CloudStack Management + database server
Our main steps would be:
- Prepare 4 hosts
- Deploy MariaDB Galera Cluster 10.x with garbd onto mgm1, mgm2 and lb2 from lb2
- Configure Keepalived and HAProxy for database and CloudStack load balancing
- Install CloudStack Management #1
- Install CloudStack Management #2
Preparing Hosts
1. Add the following hosts definition in /etc/hosts of all nodes:
192.168.1.10		virtual-ip mgm.cloustack.local
192.168.1.11		lb1 haproxy1
192.168.1.12		lb2 haproxy2 clustercontrol
192.168.1.21		mgm1.cloudstack.local mgm1 mysql1
192.168.1.22		mgm2.cloudstack.local mgm2 mysql2
2. Install NTP daemon:
$ yum -y install ntp
$ chkconfig ntpd on
$ service ntpd start
3. Ensure each host is using a valid FQDN, for example on mgm1:
$ hostname --fqdn
mgm1.cloudstrack.local
Deploying MariaDB Galera Cluster
** The deployment of the database cluster will be done from lb2, i.e., the ClusterControl node.
1. To set up MariaDB Galera Cluster, go to the Severalnines Galera Configurator to generate a deployment package. In the wizard, we used the following values when configuring our database cluster (take note that we specified one of the DB nodes twice under Database Servers’ textbox):
Vendor                   : MariaDB
MySQL Version            : 10.x
Infrastructure           : none/on-premises
Operating System         : RHEL6 - Redhat 6.4/Fedora/Centos 6.4/OLN 6.4/Amazon AMI
Number of Galera Servers : 3
Max connections	     	 : 350
OS user                  : root
ClusterControl Server    : 192.168.1.12
Database Servers         : 192.168.1.21 192.168.1.22 192.168.1.22
At the end of the wizard, a deployment package will be generated and emailed to you.
2. Download and extract the deployment package:
$ wget http://www.severalnines.com/galera-configurator3/tmp/wb06494200669221809/s9s-galera-mariadb-3.5.0-rpm.tar.gzz
$ tar -xzf s9s-galera-mariadb-3.5.0-rpm.tar.gz
3. Before we proceed with the deployment, we need to perform some customization to fit the CloudStack database environment. Go to the deployment script’s MySQL configuration file at ~/s9s-galera-mariadb-3.5.0-rpm/mysql/config/my.cnf and ensure the following options exist under the [MYSQLD] section:
innodb_rollback_on_timeout=1
innodb_lock_wait_timeout=600
log-bin=mysql-bin
4. Then, go to ~/s9s-galera-mariadb-3.5.0-rpm/mysql/config/cmon.cnf.controller and remove the repeated value on mysql_server_addresses so it becomes as below:
mysql_server_addresses=192.168.1.21,192.168.1.22
5. Now we are ready to start the deployment:
$ cd ~/s9s-galera-codership-3.5.0-rpm/mysql/scripts/install/
$ bash ./deploy.sh 2>&1 | tee cc.log
6. The DB cluster deployment will take about 15 minutes, and once completed, the ClusterControl UI is accessible at https://192.168.1.12/clustercontrol .
7. It is recommended to run Galera on at least three nodes. So, install garbd, a lightweight arbitrator daemon for Galera on the ClusterControl node from the ClusterControl UI. Go to Manage > Load Balancer > Install Garbd > choose the ClusterControl node IP address from the dropdown > Install Garbd.
You will now see your MariaDB Galera Cluster with garbd installed and binlog enabled (master) as per below:

Load Balancer and Virtual IP
1. Before we start to deploy the load balancers, make sure lb1 is accessible using passwordless SSH from ClusterControl/lb2. On lb2, copy the SSH keys to 192.168.1.11:
$ ssh-copy-id -i ~/.ssh/id_rsa root@192.168.1.11
2. Login to ClusterControl, drill down to the database cluster and click Add Load Balancer button. Deploy HAProxy on lb1 and lb2 similar to below:
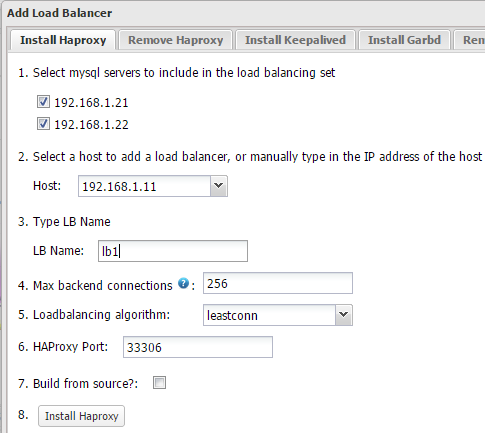
** Take note that for RHEL, ensure you check Build from source? to install HAProxy from source. This will install the latest version of HAProxy.
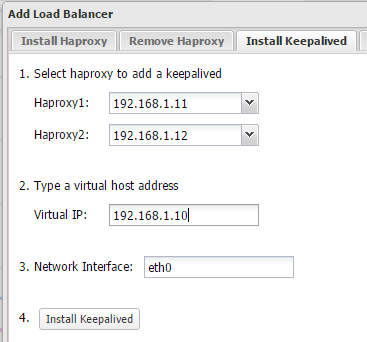
3. Install Keepalived on lb1(master) and lb2(backup) with 192.168.1.10 as virtual IP:
4. The load balancer nodes have now been installed, and are integrated with ClusterControl. You can verify this by checking out the ClusterControl summary bar:
![]()
5. By default, our script will configure the MySQL reverse proxy service to listen on port 33306 in active-active mode. We need to change this to active-passive multi master mode by declaring the second Galera node as backup, On lb1 and lb2, open /etc/haproxy/haproxy.cfg and append the word ‘backup’ into the last line:
	server 192.168.1.21 192.168.1.21:3306 check
	server 192.168.1.22 192.168.1.22:3306 check backup
6. We also need to add the load balancing definition for CloudStack. According to the documentation, we need to load balance port 8080 and 8025. To allow session stickiness, we will use source load balancing algorithm, where the same source address will be forwarded to the same management server unless it fails. On lb1 and lb2, open/etc/haproxy/haproxy.cfg and add the following lines:
frontend cloudstack_ui_8080
        bind *:8080
        mode http
        option httpchk OPTIONS /client
        option forwardfor
        option httplog
        balance source
        server mgm1.cloudstack.local 192.168.1.21:8080 maxconn 32 check inter 5000
        server mgm2.cloudstack.local 192.168.1.22:8080 maxconn 32 check inter 5000
frontend cloudstack_systemvm_8250
        bind *:8250
        mode tcp
        balance source
        server mgm1.cloudstack.local 192.168.1.21:8250 maxconn 32 check
        server mgm2.cloudstack.local 192.168.1.22:8250 maxconn 32 check
6. Restart HAProxy to apply the changes:
$ service haproxy restart
Or, you can just kill the haproxy process and let ClusterControl recover it.
7. Configure iptables to allow connections to port configured in HAProxy and Keepalived. Add the following lines:
$ iptables -I INPUT -m tcp -p tcp --dport 33306 -j ACCEPT
$ iptables -I INPUT -m tcp -p tcp --dport 8080 -j ACCEPT
$ iptables -I INPUT -m tcp -p tcp --dport 8250 -j ACCEPT
$ iptables -I INPUT -m tcp -p tcp --dport 80 -j ACCEPT
$ iptables -I INPUT -m tcp -p tcp --dport 443 -j ACCEPT
$ iptables -I INPUT -m tcp -p tcp --dport 9600 -j ACCEPT
$ iptables -I INPUT -i eth0 -d 224.0.0.0/8 -j ACCEPT
$ iptables -I INPUT -p 112 -i eth0 -j ACCEPT
$ iptables -I OUTPUT -p 112 -o eth0 -j ACCEPT
Save the iptables rules:
$ service iptables save
Installing CloudStack Management Server #1
** The following steps should be performed on mgm1.
1. Add the CloudStack repository, create /etc/yum.repos.d/cloudstack.repo and insert the following information.
[cloudstack]
name=cloudstack
baseurl=http://packages.shapeblue.com/cloudstack/upstream/centos/4.4/
enabled=1
gpgcheck=0
2. Install the CloudStack Management server:
$ yum -y install cloudstack-management
3. Create a root user with wildcard host for the CloudStack database setup. On mgm1, run the following statement:
$ mysql -u root -p
And execute the following statements:
MariaDB [(none)]> GRANT ALL PRIVILEGES ON *.* TO root@'%' IDENTIFIED BY 'password' WITH GRANT OPTION;
MariaDB [(none)]> FLUSH PRIVILEGES;
4. On mgm1, run the following command to configure the CloudStack databases:
$ cloudstack-setup-databases cloud:cloudpassword@192.168.1.10:33306 --deploy-as=root:password
5. Setup the CloudStack management application:
$ cloudstack-setup-management
** Allow some time for the CloudStack application to bootstrap on each startup. You can monitor the process at/var/log/cloudstack/management/catalina.out.
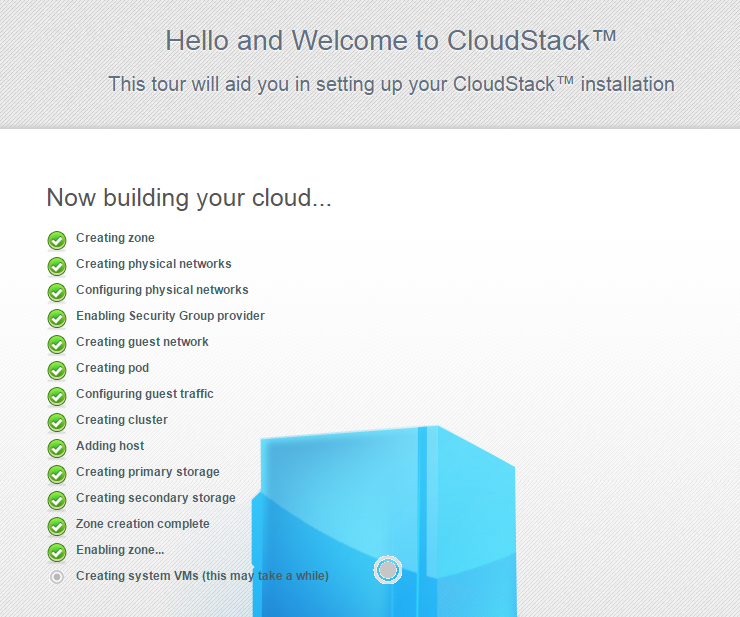
6. Open the CloudStack management UI at virtual IP, http://192.168.1.10:8080/client/ with default user ‘admin’ and password ‘password’. Configure your CloudStack environment by following the deployment wizard and let CloudStack build the infrastructure:
If completed successfully, you should then be redirected to the CloudStack Dashboard:
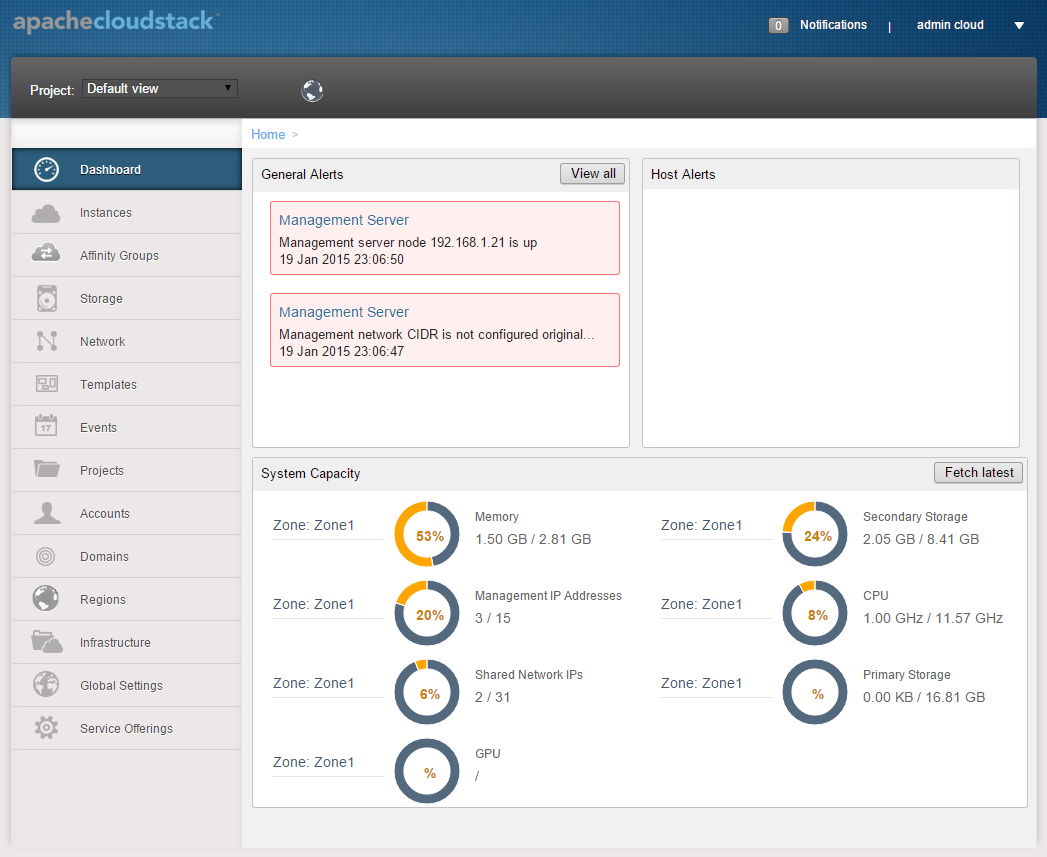
The installation of the first management server is now complete. We’ll now proceed with the second management server.
Installing CloudStack Management Server #2
** The following steps should be performed on mgm2
1. Add the CloudStack repository, create /etc/yum.repos.d/cloudstack.repo and insert the following information.
[cloudstack]
name=cloudstack
baseurl=http://cloudstack.apt-get.eu/rhel/4.4/
enabled=1
gpgcheck=0
2. Install the CloudStack Management server:
$ yum -y install cloudstack-management
3. Run the following command to setup the CloudStack database (note the absence of –deploy-as argument):
$ cloudstack-setup-databases cloud:cloudpassword@192.168.1.10:33306
4. Setup the CloudStack management application:
$ cloudstack-setup-management
** Allow some time for the CloudStack application to bootstrap on each startup. You can monitor the process at/var/log/cloudstack/management/catalina.out. At this point, this management server will automatically discover the other management server and form a cluster. Both management servers are load balanced and accessible via virtual IP, 192.168.1.10.
Lastly, change the management host IP address on every agent host at/etc/cloudstack/agent/agent.properties to the virtual IP address similar to below:
host=192.168.1.10
Restart the cloudstack agent service to apply the change:
$ service cloudstack-agent restart
Verify the Setup
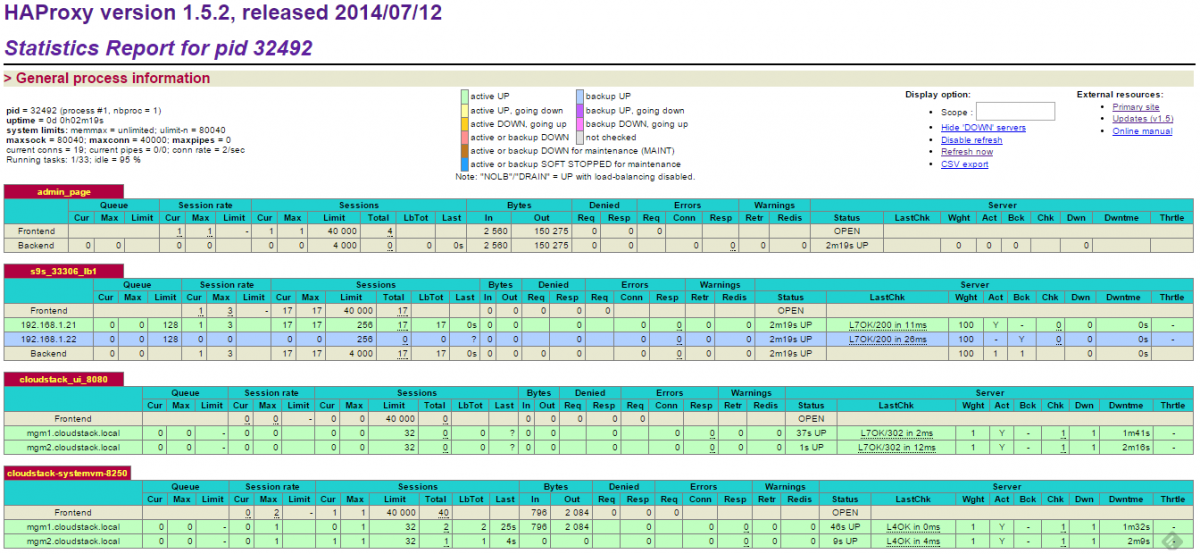
1. Check the HAProxy statistics by logging into the HAProxy admin page at lb1 host port 9600. The default username/password is admin/admin. You should see the status of nodes from the HAProxy point-of-view. Our Galera cluster is in master-standby mode, while the CloudStack management servers are load balanced:
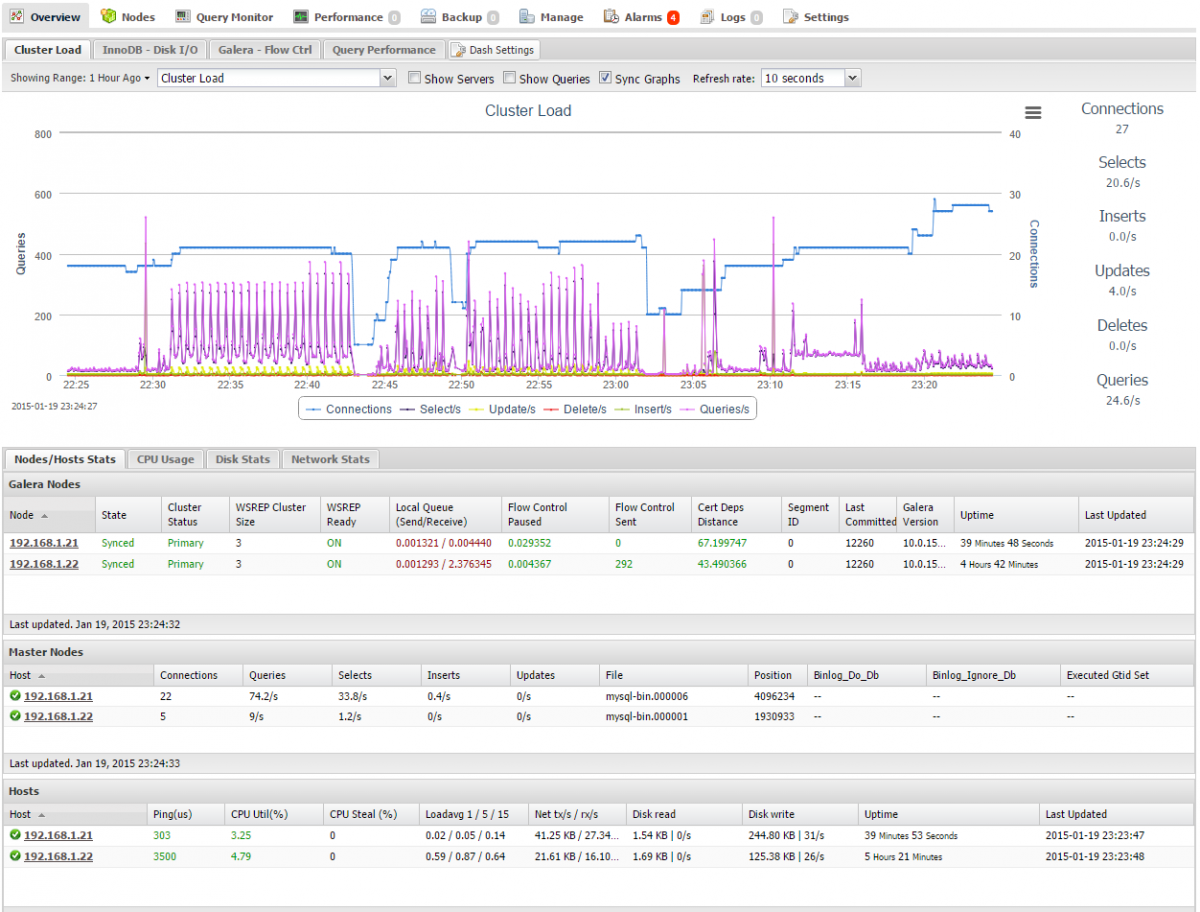
2. Check and observe the traffic on your database cluster from the ClusterControl overview page at https://192.168.1.12/clustercontrol
Reproduced with the kind permission of Severalnines
http://www.severalnines.com/blog/how-deploy-high-availability-cloudstack-mariadb-galera-cluster
Away from work, Steve is a music lover and semi-professional musician. Although he doesn’t speak at many technology conferences, he can sometimes be heard providing the evening entertainment.
