
In recent years, we’ve seen many companies upgrading from Accelerite Cloud Platform (Rovius) and its predecessor Citrix CloudPlatform (which were both single-vendor, commercial products based on Apache CloudStack) to Apache CloudStack itself. Some of the drivers behind their decision are the product stability that a large, global open-source community brings to avoid vendor lock-in and the flexibility of a real open-source solution. In addition, they strive to achieve cost efficiency and improved security and compliance. Last but not least, companies often have specific requirements for their cloud infrastructure and services, which is much easier to accomplish with an open-source platform.
Apache CloudStack as a Rovius/CloudPlatform Alternative
Apache CloudStack is widely adopted globally, is being deployed in more and more production environments, and is operated by many of the world’s largest companies. Unlike many other open-source projects, users of CloudStack overwhelmingly run the native open-source releases of the software, not vendor distributions.
Supportability
It’s a testament to the stability of Apache CloudStack that many organisations run it in production without external assistance (although problems with the platform can be discussed with the CloudStack community). However, some organisations prefer to partner with us at ShapeBlue – we provide a 24/7 SLA based support service to many enterprise CloudStack users.
Migrating from Rovius/CloudPlatform to Apache CloudStack
This document provides high-level steps to upgrade from an existing, production deployment of CloudPlatform to Apache CloudStack. ShapeBlue has extensive experience in these migrations and has migrated many organizations to Apache CloudStack without downtime. Following the steps outlined below will significantly de-risk these upgrades.
This article only covers the extra steps required when upgrading for CloudPlatform to Apache CloudStack. It does not cover the “standard” steps taken during a CloudStack > CloudStack upgrade – these are well documented elsewhere.
This document is based on a talk given on the same subject at the CloudStack Collaboration Conference 2022.
Even though it might be obvious, let’s define some acronyms used in this article:
- ACP = Accelerite CloudPlatform (Rovius)
- ACS = Apache CloudStack
- DB = database
Getting Ready for the Upgrade Process from Rovius/CloudPlatform to Apache CloudStack
As ACP is based on the ACS code base, the process of “migrating” from one to the other is effectively an upgrade process. However, unlike upgrades between ACS versions, the upgrade process will not have gone through CloudStack version release testing (which happens with every release of Apache CloudStack). Although this is a proven process, successfully completed many times, careful consideration and planning must be done to ensure success.
Before we begin, you need to have in mind that there are many variables in play. For example:
- Each environment is different
- Different source CloudPlatform version
- Different target CloudStack version
- Different database data, different database schema, patches, etc.
- g. ACP 4.11 is based on ACS 4.10, but with some DB changes
- Different auxiliary components
- Cloud Portal Business Manager (additional software available with CloudPlatform)
- LDAP / NATIVE authentication
To over-simplify, the key steps to ensure a successful migration are:
- Ensure a successful database upgrade from ACP to ACS
- After the DB upgrade, ensure minimal deviation from a clean / vanilla CloudStack DB
- Proper testing (functional, UAT)
Toolbox Required
To successfully prepare for the migration process, you also need some software tools:
- A virtual machine with a target CloudStack management server installed (for sandboxed DB upgrade)
- dbForge software:
- ‘Data compare’ & ‘Schema compare’ tools (devart.com)
- to connect to the upgraded DB and “vanilla” ACS DB
- Proper test environment for functional/UAT testing
- Optional: ACP binaries
- to spin a new test environments, upgrade to the target ACS version, and run Marvin / smoke tests.
Differences Between ACP and ACS
While ACP and ACS are essentially the same product (ie. both based on the ACS codebase) there are some differences between them that must be allowed for:
- DB version mismatch between the “same” versions
- ACP 4.11 is based on ACS 4.10
- ACP 4.7 is based on ACS 4.6 with some tables indexes from ACS 4.8, 4.9 and even 4.10
- “guest_os” and “guest_os_hypervisor” records deviate significantly
- Some specific features in ACP that are not in the upstream ACS (the same applies the other way around)
- Different implementations of the same things in ACP and ACS. For example:
- a different number of passes used in the user’s password encoding (PBKDF2)
- user’s passwords not working after upgrade to ACS
A careful analysis of these feature differentials is required. However, it is worth noting that with all of the successful migrations that we have been involved with, none of these has ever been a blocker.
dbForge Schema Compare and Data Compare tools
Before we step into the actual migration/upgrade procedure, let’s first explain the dbForge tools needed. The tools are available at https://www.devart.com/dbForge/mysql/compare-bundle/
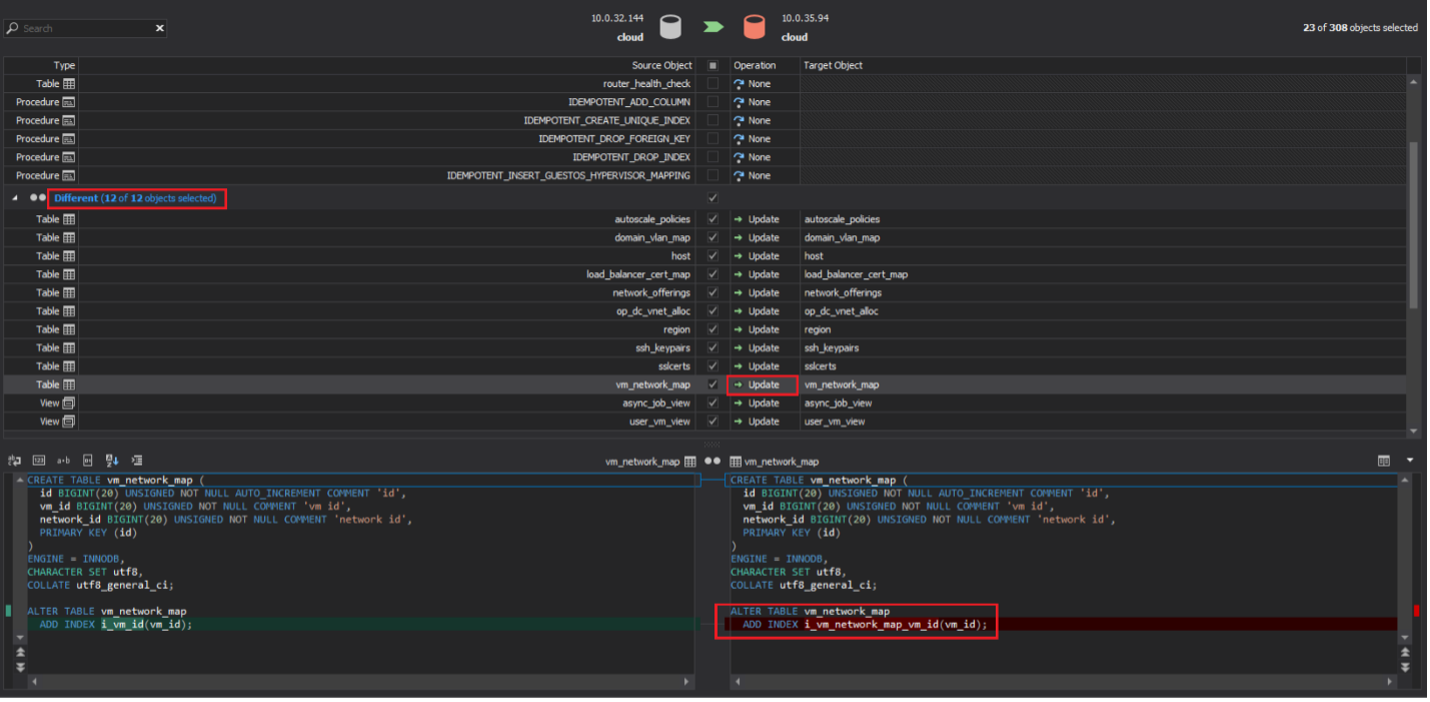
SCHEMA compare tool
The schema compare tool is used to compare table structures (field lengths, indexes, keys, column names, etc.) between different tables (databases). The procedure that we will follow is as follows:
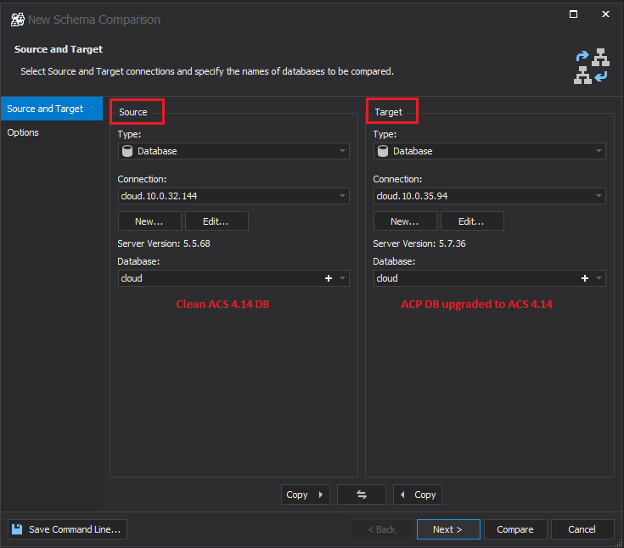
- Take the clean installation ACS schema (DB) as the source
- Take the ACP schema (DB) as the destination
- The source data is assumed to be correct, and the scripts generated by the tool will update the destination DB to match the source DB
- Thus, it’s important to not swap ACP and ACS DBs
- Make manual changes as needed
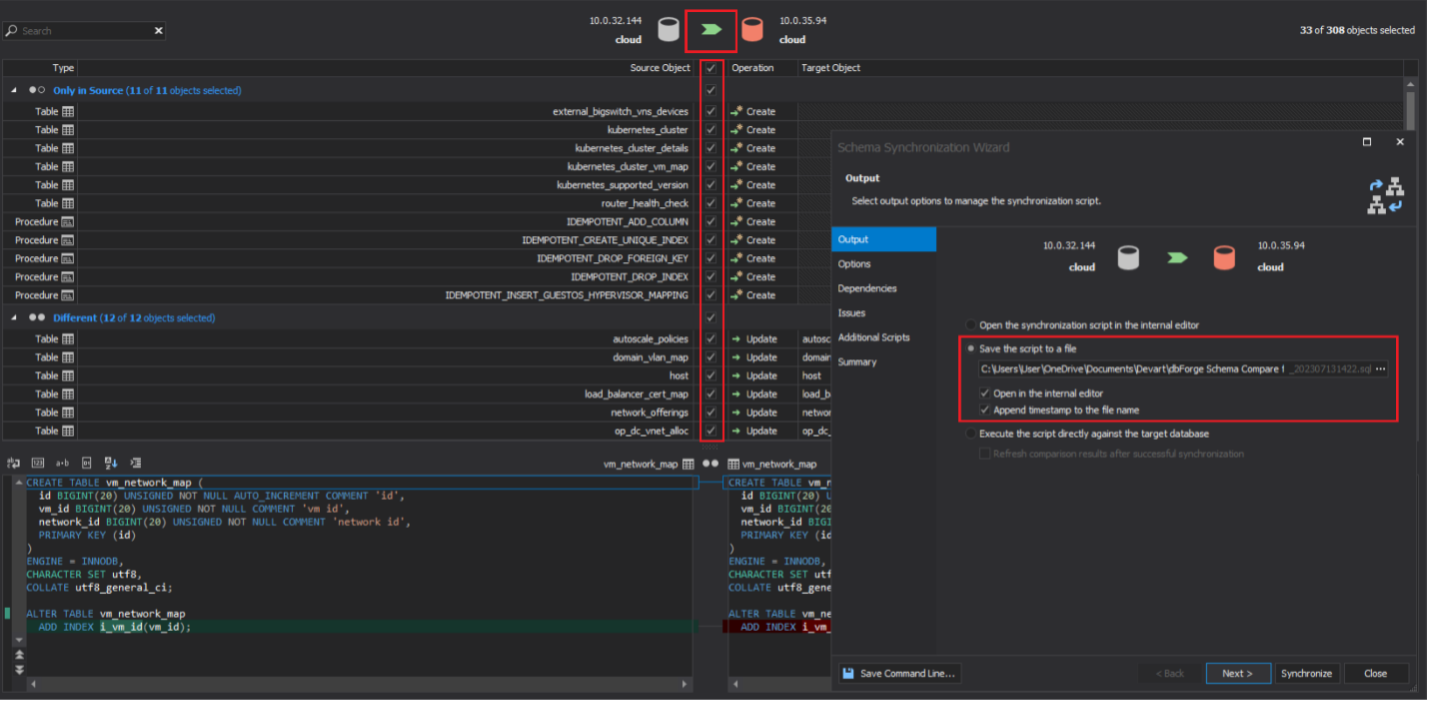
- Export the “synchronization” script to a file
Why are schema changes are important? CloudStack code (Java code) expects a certain DB schema – it’s as simple as that – so this process ensures that.
Data Compare tool
As its name implies, the Data compare tool is used to compare data in different tables.
In our case, we will want to compare data in a few “static” tables (between ACP and ACS DBs) that are of importance, while ignoring all the other tables. By “static” tables we refer to those tables that hold configuration data and are considered “static” from a day-to-day operational point of view. These are:
- configuration
- roles
- role_permission
- hypervisor_capabilities
- guest_os_hypervisor
- guest_os
The procedure is as follows:
- Take the clean installation ACS DB as the source
- Take the ACP DB as the destination
- The source data is assumed to be correct, and the scripts generated by the tool will update the destination DB to match the source DB
- Thus, it’s important to not swap ACP and ACS DBs
- Make manual changes as needed
- Export the “synchronization” script to a file
Why are data changes important? CloudStack code (Java code) expects certain data in certain tables.
Using Data compare can be challenging as we need to configure the right comparison “key” for each table (good judgement is critical here). We also need to choose columns / fields which are compared or ignored (not compared) and we have to approach this decision table by table. See an example below:
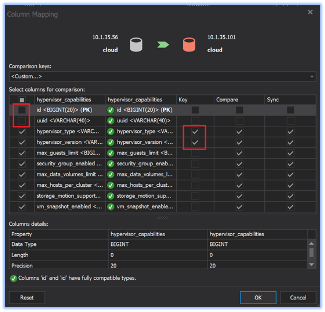
In this specific example, for table “hypervisor_capabilities”, we know that we need to compose a comparison key out of columns “hypervisor_type” and “hypervisor_version” which uniquely describes each hypervisor (this table describes each unique hypervisor capabilities). Also, we do not want to compare the “ID” and “UUID” fields values, because we know those are unique per each CloudStack installation and thus are not relevant as a comparison parameter (there would be so many false differences).
Risks with DB changes
Special care needs to be paid to the resulting synchronization SQL script, and every query generated by these tools should be reviewed by an experienced administrator. There are several risks:
- Shortening column length
- Is there data that could be truncated?
- Lowering values inside some columns
- g. number of supported disks in the “hypervisor_capabilities” table
- Wrong “keys” used in dbForge tools
- g. for “hypervisor_capabilities” the default comparison key is based on the “ID” field, and this is wrong – it needs to be set to “hypervisor_type” + “hypervisor_version”.
- False differences due to comparing data of unneeded columns
- “ID” and “UUID” are mostly irrelevant (unique for every installation) and we should probably skip comparing these (notice that we skip them in the example above, in the “hypervisor_capabilities” table)
- The same is true for e.g. “created”, “removed”, “updated” columns, etc.
High-level Upgrade Steps
We can split the whole migration/upgrade process into a few sections.
- Upgrade (a copy of) the production DB
- Usually requires pre-upgrade database troubleshooting and cleanup
- This is done in a sandboxed environment (e.g. inside a VM, network-isolated from production hosts / storage)
- Ensure easy rollback in case of failed DB upgrade (e.g. use VM snapshots)
- The idea is to make many test upgrades (thus we say “copy of the production DB”) and probably many failures, until we have done a proper clean of the original DB prior to the upgrade – and until we have a “recipe” to be used later in real production DB
- Clean up databases schema and data after the upgrade
- Required for various reasons
- Iterate if required
- Test
- Functional testing is possible only in the test environment
Production DB Upgrade
We can use the procedure below to build a new Apache CloudStack (ACS) management server, where we will test / execute the upgrade of the copy of the production DB. Before proceeding, pay attention to the chosen target versions of ACS (old hypervisors in your environment?), MySQL version (5.7 / 8.0?), compatibility between ACS and MySQL version, chosen OS version, etc.
- Build ACS management server (target OS + target ACS version)
- Install packages, but don’t configure / run the management service
- Install / configure the target MySQL version on the same server
- Create MySQL user for cloud / cloud_usage database
- “cloud” DB user / pass should be obtained from the db.properties, and used as such when creating a MySQL user and later with the cloudstack-setup-databases command
- Copy from production the “key” and “db.properties“ files, import databases
- Use the “key” to decrypt the value of the “db.cloud.encrypt.secret” from db.properties
- Use the “key” to decrypt the value of the “db.cloud.password” from db.properties
- Run the “cloudstack-setup-databases” with the obtained keys / passwords
- Simulate system VM templates being registered by Injecting records into “vm_template” so that upgrade doesn’t fail
- Perform pre-upgrade database cleanup (once you have the SQL scripts)
- Start cloudstack management server, tail -f the logs, and confirm DB upgrade is successful
It’s worth mentioning that the first database upgrade is expected to fail this stage – this is expected, and gives us valuable information. Once we have developed appropriate pre-upgrade SQL scripts that will lower the version of ACP in the “version” table, prepare guest_os table, remove any schema issues (i.e. keys / indexes) etc. we would expect success. There is more on the creation of said scripts later in this doc.
Given the high-level steps below, here are also some of the tips and details needed for the process above
- Ensure frequent VM snapshots
- Between various VM build steps
- To be able to quickly roll back if database upgrades fail.
- Decrypting values of “db.cloud.encrypt.secret” and “db.cloud.password”
- java -classpath /usr/share/cloudstack-common/lib/jasypt-1.9.2.jar org.jasypt.intf.cli.JasyptPBEStringDecryptionCLI decrypt.sh input=<ENCRYPTED-VALUE> password=<management-key-value> verbose=true
- Management server setup
- cloudstack-setup-databases cloud:<cloud db password>@<cloud db host> -i <management server IP address> -m <mgmt-key> -k <database-encryption-key>
- Simulate system VM templates are in place so that the upgrade doesn’t fail
- TLDR/W – please see the video with the demo: https://youtu.be/dJEf3y-embs?t=2396
PRE-UPGRADE Database Cleanup
Before we can upgrade the ACP database to a new version of ACS, you should be aware that this process will usually require a few iiterations. This is due to ACP not following the same versioning scheme as ACS, and also ACP DBs are modified, which causes upgrades to fail (i.e. some indexes are added, and the upgrade itself also tries to create the same indexes, which is impossible to do as they already exist – so we need to first remove those indexes in the source ACP DB and only then attempt to do the DB upgrade).
Some other things to be aware of:
- Pre-upgrade cleanup depends on the ACP version, custom patches, and additions of guest OS records
- Usually boils down to:
- Deleting extra records from the “guest_os” table
- Lowering the version by deleting a few rows in the “version” table
- Adding / removing keys / indexes / other schema changes
- ACP 4.7 has a lot of keys / indexes improvements from ACS 4.8, 4.9 and even 4.10, but is based on ACS 4.6 version
- This means we need to undo all the schema changes “after ACS 4.6”,
so that the ACS SQL upgrade scripts can run successfully (from 4.6 and onwards)
- “guest_os” table (this one is probably the biggest task):
- Records / values started drifting significantly in recent ACP / ACS versions
- We need to remove records with IDs that the ACS upgrade is trying to inject – otherwise,
the DB upgrade will fail (as a record with the same ID already exists) - After the upgrade, we will need to “reset” the table content to the vanilla one
- This later requires updating references in various other tables
- “version” table
- We need to work out which ACS version is the current ACP version based on
- Done by understanding different failures of the DB upgrade
- Done by checking the ACS SQL upgrade files
- g. ACP 4.7 is based on ACS 4.6, ACP 4.11 is based on ACS 4.10
- Various “extra” keys/indexes/columns (“backported” from newer ACS versions)
- …need to be removed, so ACS upgrade can add those
POST-UPGRADE Database Cleanup
We have already shared some general guidance about using dbForge Schema compare and Data compare tools. This includes analyzing both the schema changes (relatively easy) and data changes (a little more complicated). In both cases, you will end up with a set of SQL scripts that later need to be executed against the upgraded DB.
Some notes on why those changes are needed:
- To ensure that ACS will not throw exceptions and various functionalities will not be broken.
- To ensure future upgrades would not fail due to expecting some “clean” ACS data / schema, while an older ACP data / schema is there.
- Role permissions records are completely missing in ACP DB.
- Hypervisor capabilities differ between ACP and ACS DBs.
- Potentially problematic “configuration” table (global settings table) in ACP DB.
- Private gateway fix (“guest” instead “PrivateGw” in “network” and ”network_offering” tables)
- Creating index “unique_index” on table “ssh_keypairs” (part of schema update) may fail due to duplicate records (if any) – so you’ll need to manually remove the older one of each duplicate key.
GUEST_OS Table Specifics
Since the data (list of OSes) in the “guest_os” table has started to drift away (as of ID 254 and onwards, see the image below) in the ACP database from ACS, it is recommended to completely replace the content of “guest_os” table with the content of the same table from the clean ACS installation of a target version, to avoid any issues in the future with duplicate or otherwise broken guest OS-es.
Later, you would be changing references in the “vm_instance”, “vm_template”, and “guest_os_hypervisor” tables, to point to the new IDs of the same kind of OS that those references were pointing originally.
To give you an idea of the remapping process (or more precisely on identifying which guest OS IDs need to be replaced with new guest OS IDS) – please see the image below (this is an example comparing ACP version 4.11.0.7 and a clean ACS version 4.13.1.0 from a past customer project):
As an example, you can see that the OS “Windows Server 2019 (64-bit)” has ID 284 in the ACP database, while the same OS has ID 276 in the ACS database.

For updating a reference in “vm_instance”, “vm_template” and “guest_os_hypervisor” you would need to manually create a set of SQL queries to do the proper replacement of the references with new IDs.
Below, you can find a “bonus” to this article – a detailed set of SQL scripts that will do the needed ID reference changes (per the image above) – there are 29 different guest OS-es to handle, but for brevity, we show just the first 5 OS-es:
# Since we wiped the upgraded ACP “guest_os table” and replaced its content with the content from the clean ACS 4.13 guest_os table, now let’s remap any references in “vm_template”, “vm_instance” and “guest_os_hypervisor” tables, to point to the new IDs from the guest_os table, for the same/identical OS type they were pointing to previously.
# “guest_os_details” table is also wiped in the ACP upgraded DB and replaced with the content of the same table from the clean 4.13 installation, so no references to update in this table, since they already are from the clean CloudStack 4.13 install database.
# create temp tables
CREATE TABLE IF NOT EXISTS TEMP_VM_IDs LIKE vm_instance;
CREATE TABLE IF NOT EXISTS TEMP_TEMPLATE_IDs LIKE vm_template;
CREATE TABLE IF NOT EXISTS TEMP_GUESTOSHYPERVISOR_IDs LIKE guest_os_hypervisor;
# populate temp table as the input for later update statements
# this is required since simple update XXX where YYY will not work due to cyclic overwrite / loop
# vm_instances
INSERT INTO TEMP_VM_IDs
SELECT * FROM vm_instance WHERE guest_os_id IN (254,255,256,257,258);
# vm_template
INSERT INTO TEMP_TEMPLATE_IDs
SELECT * FROM vm_template WHERE guest_os_id IN (254,255,256,257,258);
# guest_os_hypervisor
INSERT INTO TEMP_GUESTOSHYPERVISOR_IDs
SELECT * FROM guest_os_hypervisor WHERE guest_os_id IN (254,255,256,257,258);
SET FOREIGN_KEY_CHECKS=0;
UPDATE vm_instance SET guest_os_id=270 WHERE id IN (SELECT id from TEMP_VM_IDs where guest_os_id=254);
UPDATE vm_instance SET guest_os_id=258 WHERE id IN (SELECT id from TEMP_VM_IDs where guest_os_id=255);
UPDATE vm_instance SET guest_os_id=257 WHERE id IN (SELECT id from TEMP_VM_IDs where guest_os_id=256);
UPDATE vm_instance SET guest_os_id=276 WHERE id IN (SELECT id from TEMP_VM_IDs where guest_os_id=257);
UPDATE vm_instance SET guest_os_id=254 WHERE id IN (SELECT id from TEMP_VM_IDs where guest_os_id=258);
UPDATE vm_template SET guest_os_id=270 WHERE id IN (SELECT id from TEMP_TEMPLATE_IDs where guest_os_id=254);
UPDATE vm_template SET guest_os_id=258 WHERE id IN (SELECT id from TEMP_TEMPLATE_IDs where guest_os_id=255);
UPDATE vm_template SET guest_os_id=257 WHERE id IN (SELECT id from TEMP_TEMPLATE_IDs where guest_os_id=256);
UPDATE vm_template SET guest_os_id=276 WHERE id IN (SELECT id from TEMP_TEMPLATE_IDs where guest_os_id=257);
UPDATE vm_template SET guest_os_id=254 WHERE id IN (SELECT id from TEMP_TEMPLATE_IDs where guest_os_id=258);
UPDATE guest_os_hypervisor SET guest_os_id=270 WHERE id IN (SELECT id from TEMP_GUESTOSHYPERVISOR_IDs where guest_os_id=254);
UPDATE guest_os_hypervisor SET guest_os_id=258 WHERE id IN (SELECT id from TEMP_GUESTOSHYPERVISOR_IDs where guest_os_id=255);
UPDATE guest_os_hypervisor SET guest_os_id=257 WHERE id IN (SELECT id from TEMP_GUESTOSHYPERVISOR_IDs where guest_os_id=256);
UPDATE guest_os_hypervisor SET guest_os_id=276 WHERE id IN (SELECT id from TEMP_GUESTOSHYPERVISOR_IDs where guest_os_id=257);
UPDATE guest_os_hypervisor SET guest_os_id=254 WHERE id IN (SELECT id from TEMP_GUESTOSHYPERVISOR_IDs where guest_os_id=258);
DROP TABLE TEMP_VM_IDs;
DROP TABLE TEMP_TEMPLATE_IDs;
DROP TABLE TEMP_GUESTOSHYPERVISOR_IDs;
SET FOREIGN_KEY_CHECKS=1;
How to Migrate from Rovius/CloudPlatform to Apache CloudStack
Although relatively straightforward, upgrading from Accelerite CloudPlatform / Rovius to Apache CloudStack is not as simple as a standard CloudStack upgrade – care has to be taken to ensure that the differences are accounted for during the upgrade. However, if these steps are followed carefully, there is no reason that migrations cannot be achieved consistently and with zero downtime. The benefits of moving from a commercial product that is based overwhelmingly on a major open-source platform to the actual open-source platform are apparent.
To see more detailed steps and an example of our customer engagement project, please see the video below.
Ingo is Head of Architecture at ShapeBlue, with a background spanning roles from Cloud Systems Engineer to Head of Datacenter. He brings deep experience across on-premise, private, and public cloud infrastructures, with a strong focus on CloudStack and open-source technologies. Outside of work, he enjoys ultra-distance running, motocross, and hands-on projects like home automation and DIY crafting.
