Introduction
Configuring connectivity between CloudStack hosted VPCs can be done by either using private gateways – which has to be configured by CloudStack root administrators to use dedicated network segments – or by using VPC-to-VPC connections, which can be configured by the CloudStack end user without admin input.
In this blog post we will cover how to configure the VPC-to-VPC VPN connections and ensuring that these are up and working as expected. This is covered in the CloudStack administration guide – but the terms used may be unfamiliar to anyone new to CloudStack and VPC networking, and we hope to add some clarity to this. In addition to the configuration of VPN we also cover some troubleshooting and operational steps.
Networking overview
To be able to route traffic from a VM in one VPC to a VM in another VPC the IP ranges used in the two VPCs must be unique and can not overlap. If the same IP ranges were used the traffic from one side of the VPN tunnel to the other would not route over the tunnel itself, hence connectivity could not be established.
As an example the two VPC networks could be configured as follows:
VPC1:
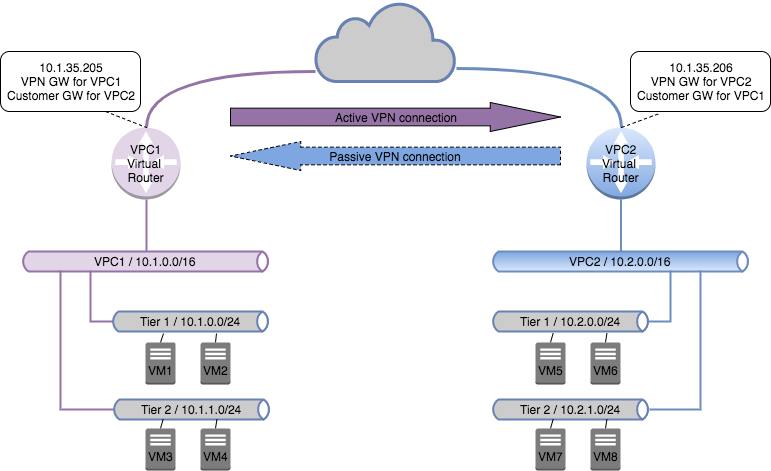
- Super-CIDR: 10.1.0.0/16
- Tier 1: 10.1.0.0/24
- Tier 2: 10.1.1.0/24
VPC2:
- Super-CIDR: 10.2.0.0/16
- Tier 1: 10.2.0.0/24
- Tier 2: 10.2.1.0/24
Apart from this the VPC-to-VPC VPN tunnel will be using the CloudStack public network – hence the two VPC networks can be:
- On the same CloudStack infrastructure, using the same account.
- On the same CloudStack infrastructure, using different accounts.
- On different CloudStack infrastructures altogether (please note however different versions of CloudStack may run different VPN versions hence there may be incompatibilities under some circumstances).
For the purpose of this article we are going to use the following network topology:
Terms used
VPN gateway
The VPN gateway is the term used for the local VPN endpoint. This is simply enabled on the source-NAT IP address of the VPC virtual router – and it allows the local VR to accept incoming VPN connections.
VPN customer gateway
The VPN customer gateway is the remote endpoint we target when we configure the VPN connection. When we configure these we need to specify all the details for this VPN connection:
- Name: user friendly name for the gateway
- Gateway: the public facing IP address of the remote VPC virtual router.
- CIDR list: this is a list of CIDR networks which are reachable at the remote end of the tunnel. Multiple CIDR ranges can be specified, separated my commas.
- IPsec pre-shared key: this is effectively the VPN passphrase used when the VPN connection is negotiated – and it should therefore follow standard password best practices in a production environment.
- IKE / ESP encryption details for the VPN tunnels.
VPN connection
The VPN connection is the pairing from the source – or local – VPN gateway to the remove VPN customer gateway. This is configured in one of two modes:
- Active: the connection which initiates the VPN tunnel, typically from the VPC hosting VMs which consumes resources on the remote VPC.
- Passive: this connection waits for the opposite VPC VR to initiate the connection, and is typically on the VPC hosting the resources to be consumed.
Please note for both of these connections the resources either end must be reachable over the CIDR list configured for the VPN customer gateway.
Configuring the VPN tunnels
Create and configure the VPC networks
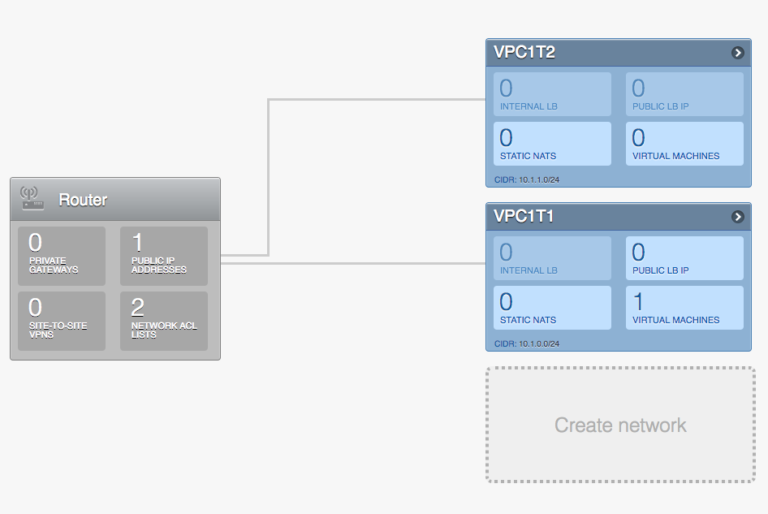
First of all configure the VPC networks at either end with the required VPC ACL lists.
Create customer gateways
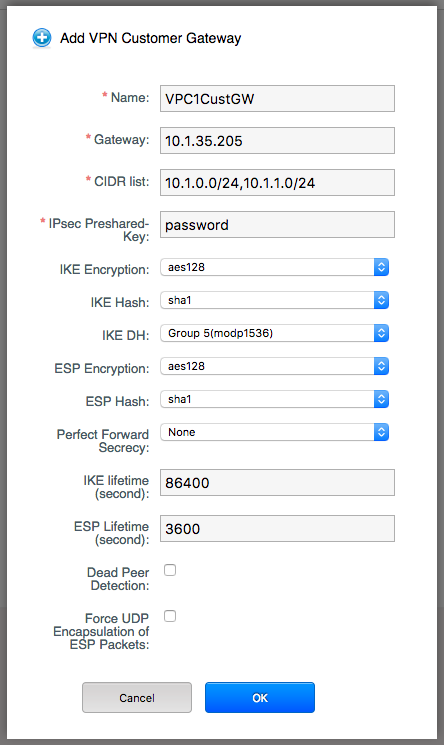
Navigate to “Network” and select “VPN customer gateway” on the pulldown menu, the click the “Add VPN customer gateway” button.
In this example we assume that VMs on both VPC1 tier 1 and 2 will consume resources on VPC2. Please note in this case we only configure the name, public gateway, CIDR list and the IPsec preshared key, all other fields are left as defaults.
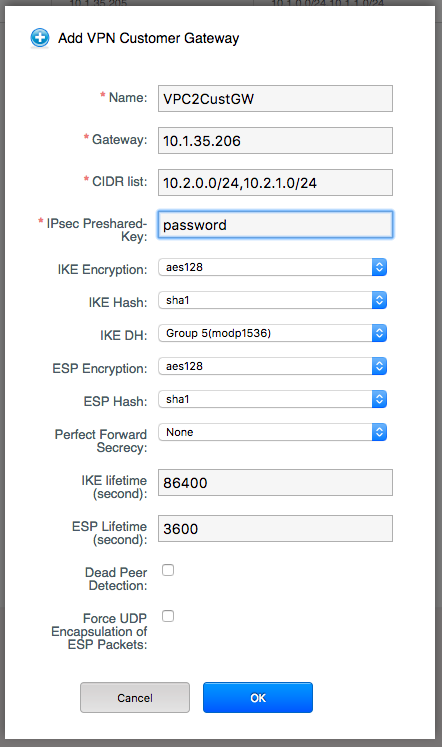
Repeat this step for the customer gateway on VPC2:
Create the VPN gateway on each VPC
Navigate to each VPC, click the configure button and then click the “Site to site VPN” pane under “Router”. Confirm you want to create the VPN gateway:
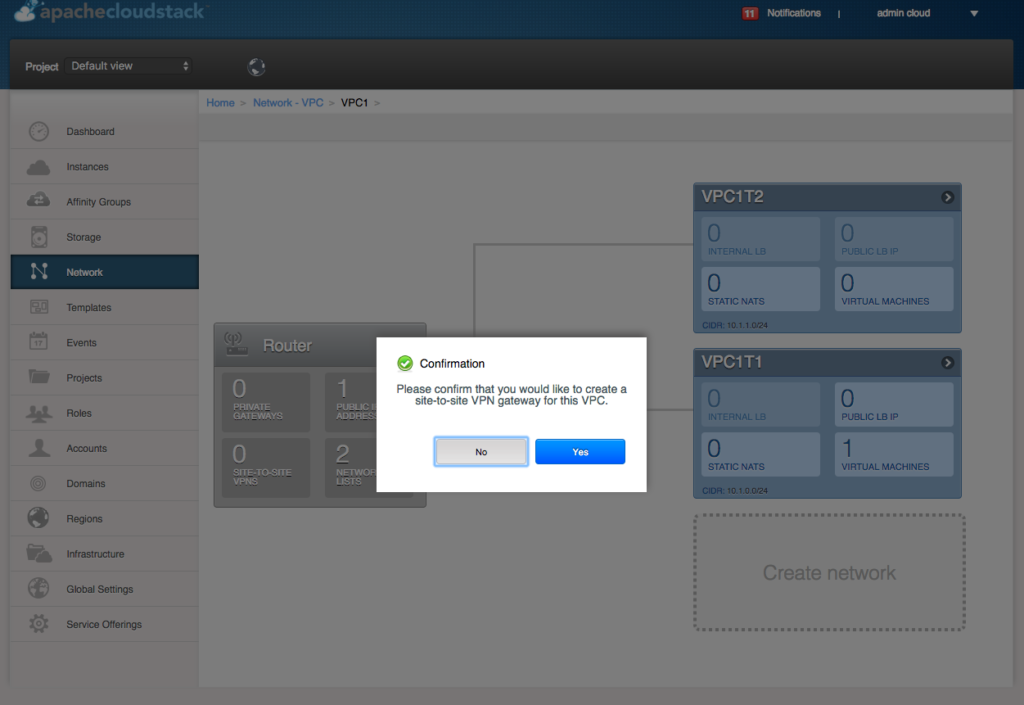
This will simply configure the local VPN gateway – and no further configuration input is required. The only actions that can be carried out against a VPN gateway is to delete this from the VPC.
Repeat the above step for VPC2 before continuing.
Configure the VPN connections
First of all configure the active connection – in this example we will configure this to be the connection from VPC1 to VPC2.
Navigate to VPC1, click “configure”, then click on the “Site to site VPN” pane. From the “select view” pulldown menu select “VPN connections” and click the “Create VPN connection” button.
Next select the remote Customer VPN gateway – and do not tick the “active” tick box. Click OK.
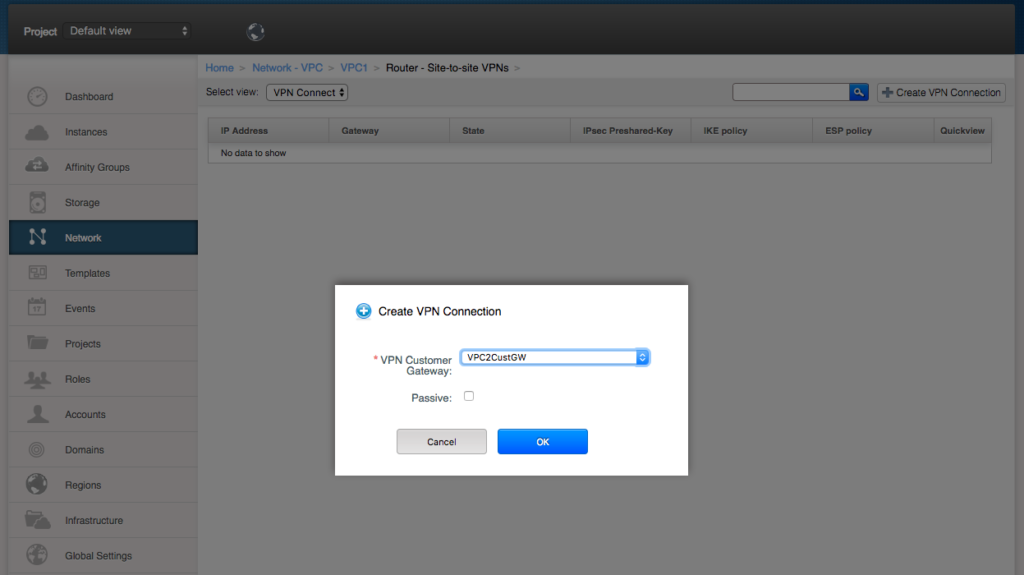
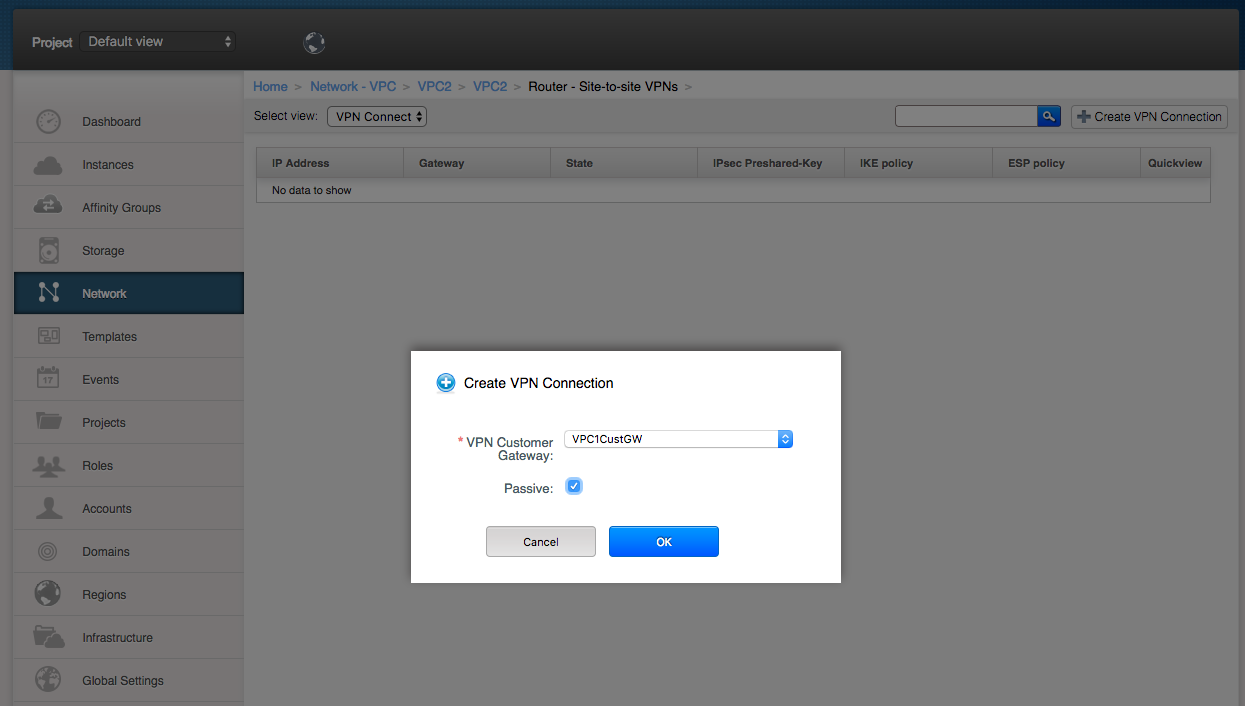
Repeat this step for the passive connection from VPC2 to VPC1, but for this one tick the “passive” tick box:
Once both VPN connection have been configured refresh the screen and ensure the VPN connection state is “connected”.
If the VPN connection doesn’t come up automatically simply go back to the active connection (from VPC1 to VPC2) and click the “Reset VPN connection” button:
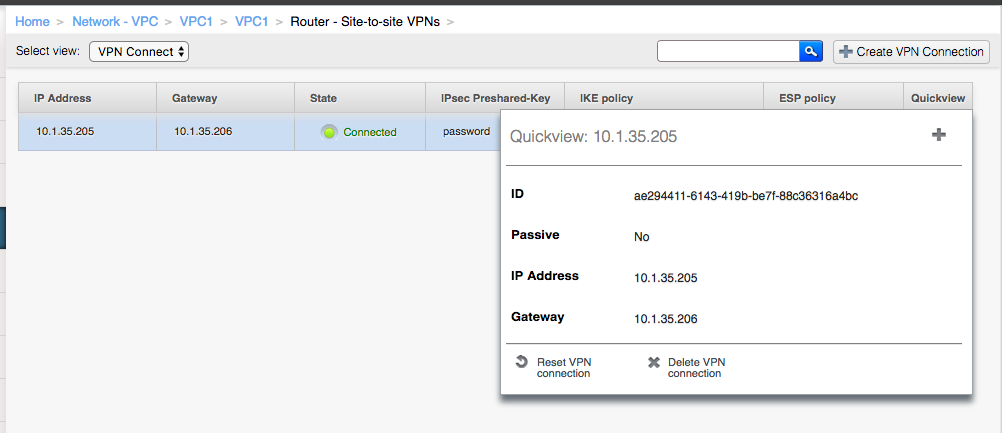
Once the VPN connections are in a “connected” state VMs on VPC1 should be able to connect to VMs on VPC2.
Operation and troubleshooting
If the VPC-to-VPC connection doesn’t work as expected check the following:
- ACL lists: all VPC-to-VPC connections still adhere to the Access Control Lists set for each VPC tier, i.e. if a tier is configured to use e.g. “default_deny” then neither traffic on a different tier locally or traffic from remote VPCs will reach the VMs in question.
- To check the VPN tunnels on the VPC virtual router, log in using the standard connection method for the hypervisor in use, then check the status of the VPN tunnels with the “ipsec statusall” command:
root@r-12-VM:~# ipsec statusall
Status of IKE charon daemon (strongSwan 5.2.1, Linux 3.2.0-4-amd64, x86_64):
uptime: 7 days, since Jun 12 11:06:50 2017
malloc: sbrk 675840, mmap 0, used 570816, free 105024
worker threads: 11 of 16 idle, 5/0/0/0 working, job queue: 0/0/0/0, scheduled: 7
loaded plugins: charon test-vectors ldap pkcs11 aes rc2 sha1 sha2 md5 rdrand random nonce x509 revocation constraints pubkey pkcs1 pkcs7 pkcs8 pkcs12 pgp dnskey sshkey pem gcrypt af-alg fips-prf gmp xcbc cmac hmac ctr ccm curl attr kernel-netlink resolve socket-default farp stroke updown eap-identity eap-aka eap-md5 eap-gtc eap-mschapv2 eap-radius eap-tls eap-ttls eap-tnc xauth-generic xauth-eap xauth-pam tnc-tnccs dhcp lookip error-notify certexpire led addrblock unity
Listening IP addresses:
169.254.0.47
10.1.35.205
10.1.0.1
Connections:
vpn-10.1.35.206: 10.1.35.205...10.1.35.206 IKEv1/2
vpn-10.1.35.206: local: [10.1.35.205] uses pre-shared key authentication
vpn-10.1.35.206: remote: [10.1.35.206] uses pre-shared key authentication
vpn-10.1.35.206: child: 10.1.0.0/16 === 10.2.0.0/24 10.2.1.0/24 TUNNEL
L2TP-PSK: 172.26.0.151...%any IKEv1
L2TP-PSK: local: [172.26.0.151] uses pre-shared key authentication
L2TP-PSK: remote: uses pre-shared key authentication
L2TP-PSK: child: dynamic[udp/l2f] === 0.0.0.0/0[udp] TRANSPORT
Security Associations (1 up, 0 connecting):
vpn-10.1.35.206[20]: ESTABLISHED 11 minutes ago, 10.1.35.205[10.1.35.205]...10.1.35.206[10.1.35.206]
vpn-10.1.35.206[20]: IKEv2 SPIs: 8eb5107dc41c7283_i* b780fce44dd22ba5_r, pre-shared key reauthentication in 23 hours
vpn-10.1.35.206[20]: IKE proposal: AES_CBC_128/HMAC_SHA1_96/PRF_HMAC_SHA1/MODP_1536
vpn-10.1.35.206{25}: INSTALLED, TUNNEL, ESP SPIs: c884bc58_i cf7ce84c_o
vpn-10.1.35.206{25}: AES_CBC_128/HMAC_SHA1_96, 57204 bytes_i (681 pkts, 1s ago), 58212 bytes_o (693 pkts, 1s ago), rekeying in 31 minutes
vpn-10.1.35.206{25}: 10.1.0.0/24 10.1.1.0/24 === 10.2.0.0/24 10.2.1.0/24
- From the above please note the following lines which lined the tunnel connection:
Connections:
vpn-10.1.35.206: 10.1.35.205...10.1.35.206 IKEv1/2
vpn-10.1.35.206: local: [10.1.35.205] uses pre-shared key authentication
vpn-10.1.35.206: remote: [10.1.35.206] uses pre-shared key authentication
vpn-10.1.35.206: child: 10.1.0.0/16 === 10.2.0.0/24 10.2.1.0/24 TUNNEL
- As well as the following which list the networks at each side of the connection:
vpn-10.1.35.206{25}: 10.1.0.0/24 10.1.1.0/24 === 10.2.0.0/24 10.2.1.0/24
- The logs for the IPsec VPN connections can be found in:
- /var/log/cloud.log: CloudStack handshaking for the VPN tunnels.
- /var/log/auth.log: shows the IPsec handshakes for the VPN tunnel.
- /var/log/daemon.log: similar to auth.log, shows the VPN tunnel handshaking and output.
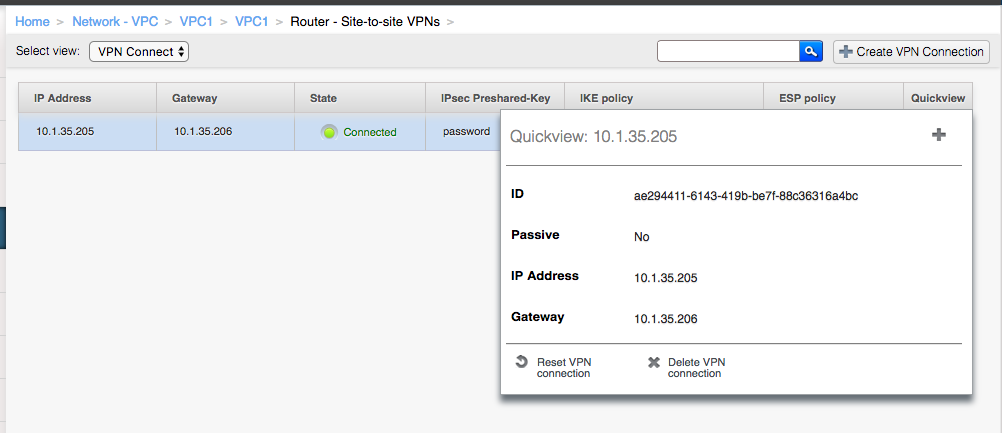
- To stop a VPN connection simply delete it from the VPC configuration screen – this will remove the VPN connection but leave the VPN gateway and VPN customer gateway in place:
Conclusion
We hope this article will clarify the terms used and the configuration steps required to configure a VPC-to-VPC VPN connection. As always we’re happy to receive feedback , so please get in touch with any comments, questions or suggestions.
About The Author
Dag Sonstebo is a Cloud Architect at ShapeBlue, The Cloud Specialists. Dag spends most of his time designing, implementing and automating IaaS solutions based on on Apache CloudStack.
Ivet Petrova is the Marketing Director of ShapeBlue. She is responsible for strengthening ShapeBlue’s global brand and market awareness of ShapeBlue’s services. Specifically, Ivet’s team is responsible for brand, advertising, content and digital marketing, social media, and media relations.
Ivet is also an active member of the CloudStack community, working on increasing the awareness of the technology and showing its benefits to a wider market.
Ivet has 13+ years of experience in marketing for IT service providers including a number of cloud and hosting providers, storage companies, SaaS providers and software development companies. She holds a Masters degree in Marketing.
Away from work, Ivet is passionate about travelling around the world and exploring new cultures.


