
Introduction
We published the original blog post on KVM networking in 2016 – but in the meantime we have moved on a generation in CentOS and Ubuntu operating systems, and some of the original information is therefore out of date. In this revisit of the original blog post we cover new configuration options for CentOS 7.x as well as Ubuntu 18.04, both of which are now supported hypervisor operating systems in CloudStack 4.11. Ubuntu 18.04 has replaced the legacy networking model with the new Netplan implementation, and this does mean different configuration both for linux bridge setups as well as OpenvSwitch.
KVM hypervisor networking for CloudStack can sometimes be a challenge, considering KVM doesn’t quite have the same mature guest networking model found in the likes of VMware vSphere and Citrix XenServer. In this blog post we’re looking at the options for networking KVM hosts using bridges and VLANs, and dive a bit deeper into the configuration for these options. Installation of the hypervisor and CloudStack agent is pretty well covered in the CloudStack installation guide, so we’ll not spend too much time on this.
Network bridges
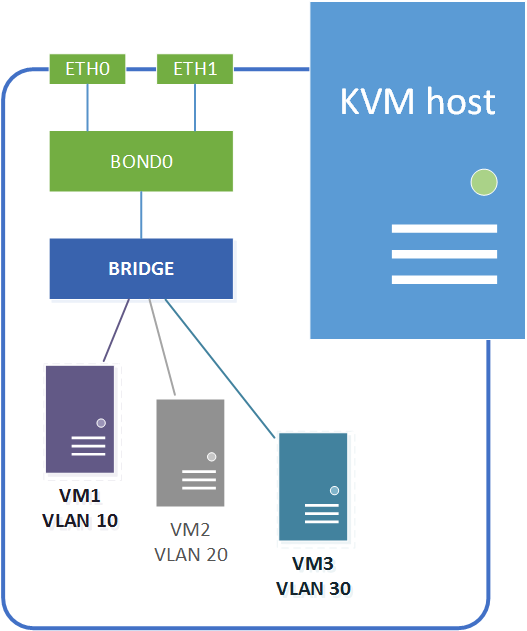
On a linux KVM host guest networking is accomplished using network bridges. These are similar to vSwitches on a VMware ESXi host or networks on a XenServer host (in fact networking on a XenServer host is also accomplished using bridges).
A KVM network bridge is a Layer-2 software device which allows traffic to be forwarded between ports internally on the bridge and the physical network uplinks. The traffic flow is controlled by MAC address tables maintained by the bridge itself, which determine which hosts are connected to which bridge port. The bridges allow for traffic segregation using traditional Layer-2 VLANs as well as SDN Layer-3 overlay networks.
Linux bridges vs OpenVswitch
The bridging on a KVM host can be accomplished using traditional linux bridge networking or by adopting the OpenVswitch back end. Traditional linux bridges have been implemented in the linux kernel since version 2.2, and have been maintained through the 2.x and 3.x kernels. Linux bridges provide all the basic Layer-2 networking required for a KVM hypervisor back end, but it lacks some automation options and is configured on a per host basis.
OpenVswitch was developed to address this, and provides additional automation in addition to new networking capabilities like Software Defined Networking (SDN). OpenVswitch allows for centralised control and distribution across physical hypervisor hosts, similar to distributed vSwitches in VMware vSphere. Distributed switch control does require additional controller infrastructure like OpenDaylight, Nicira, VMware NSX, etc. – which we won’t cover in this article as it’s not a requirement for CloudStack.
It is also worth noting Citrix started using the OpenVswitch backend in XenServer 6.0.
Network configuration overview
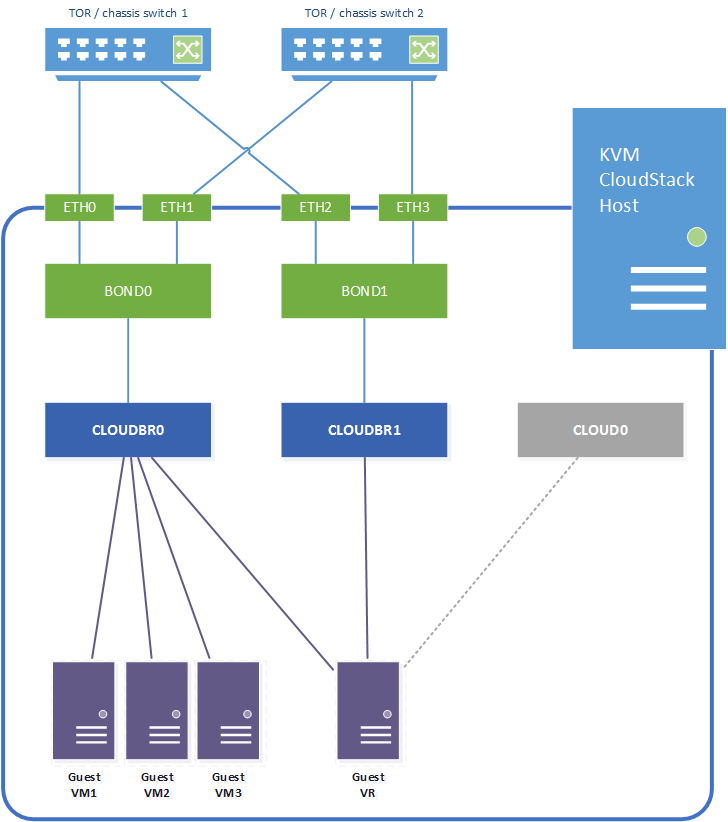
For this example we will configure the following networking model, assuming a linux host with four network interfaces which are bonded for resilience. We also assume all switch ports are trunk ports:
- Network interfaces eth0 + eth1 are bonded as bond0.
- Network interfaces eth2 + eth3 are bonded as bond1.
- Bond0 provides the physical uplink for the bridge “cloudbr0”. This bridge carries the untagged host network interface / IP address, and will also be used for the VLAN tagged guest networks.
- Bond1 provides the physical uplink for the bridge “cloudbr1”. This bridge handles the VLAN tagged public traffic.
The CloudStack zone networks will then be configured as follows:
- Management and guest traffic is configured to use KVM traffic label “cloudbr0”.
- Public traffic is configured to use KVM traffic label “cloudbr1”.
In addition to the above it’s important to remember CloudStack itself requires internal connectivity from the hypervisor host to system VMs (Virtual Routers, SSVM and CPVM) over the link local 169.254.0.0/16 subnet. This is done over a host-only bridge “cloud0”, which is created by CloudStack when the host is added to a CloudStack zone.
Linux bridge configuration – CentOS
In the following CentOS example we have changed the NIC naming convention back to the legacy “eth0” format rather than the new “eno16777728” format. This is a personal preference – and is generally done to make automation of configuration settings easier. The configuration suggested throughout this blog post can also be implemented using the new NIC naming format.
Across all CentOS versions the “NetworkManager” service is also generally disabled, since this has been found to complicate KVM network configuration and cause unwanted behaviour:
# systemctl stop NetworkManager
# systemctl disable NetworkManager
To enable bonding and bridging CentOS 7.x requires the modules installed / loaded:
# modprobe --first-time bonding
# yum -y install bridge-utils
If IPv6 isn’t required we also add the following lines to /etc/sysctl.conf:
net.ipv6.conf.all.disable_ipv6 = 1
net.ipv6.conf.default.disable_ipv6 = 1
net.ipv6.conf.lo.disable_ipv6 = 1
In CentOS the linux bridge configuration is done with configuration files in /etc/sysconfig/network-scripts/. Each of the four individual NIC interfaces are configured as follows (eth0 / eth1 / eth2 / eth3 are all configured the same way). Note there is no IP configuration against the NICs themselves – these purely point to the respective bonds:
# vi /etc/sysconfig/network-scripts/ifcfg-eth0
DEVICE=eth0
NAME=eth0
TYPE=Ethernet
BOOTPROTO=none
ONBOOT=yes
MASTER=bond0
SLAVE=yes
HWADDR=00:0C:12:xx:xx:xx
NM_CONTROLLED=no
The bond configurations are specified in the equivalent ifcfg-bond scripts and specify bonding options as well as the upstream bridge name. In this case we’re just setting a basic active-passive bond (mode=1) with up/down delays of zero and status monitoring every 100ms (miimon=100). Note there are a multitude of bonding options – please refer to the CentOS / RedHat official documentation to tune these to your specific use case.
# vi /etc/sysconfig/network-scripts/ifcfg-bond0
DEVICE=bond0
NAME=bond0
TYPE=Bond
BRIDGE=cloudbr0
ONBOOT=yes
NM_CONTROLLED=no
BONDING_OPTS="mode=active-backup miimon=100 updelay=0 downdelay=0"
The same goes for bond1:
# vi /etc/sysconfig/network-scripts/ifcfg-bond1
DEVICE=bond1
NAME=bond1
TYPE=Bond
BRIDGE=cloudbr1
ONBOOT=yes
NM_CONTROLLED=no
BONDING_OPTS="mode=active-backup miimon=100 updelay=0 downdelay=0"
Cloudbr0 is configured in the ifcfg-cloudbr0 script. In addition to the bridge configuration we also specify the host IP address, which is tied directly to the bridge since it is on an untagged VLAN:
# vi /etc/sysconfig/network-scripts/ifcfg-cloudbr0
DEVICE=cloudbr0
ONBOOT=yes
TYPE=Bridge
IPADDR=192.168.100.20
NETMASK=255.255.255.0
GATEWAY=192.168.100.1
NM_CONTROLLED=no
DEFROUTE=yes
IPV4_FAILURE_FATAL=no
IPV6INIT=no
DELAY=0
Cloudbr1 does not have an IP address configured hence the configuration is simpler:
# vi /etc/sysconfig/network-scripts/ifcfg-cloudbr1
DEVICE=cloudbr1
ONBOOT=yes
TYPE=Bridge
BOOTPROTO=none
NM_CONTROLLED=no
DELAY=0
DEFROUTE=no
IPV4_FAILURE_FATAL=no
IPV6INIT=no
Optional tagged interface for storage traffic
If a dedicated VLAN tagged IP interface is required for e.g. storage traffic this can be accomplished by created a VLAN on top of the bond and tying this to a dedicated bridge. In this case we create a new bridge on bond0 using VLAN 100:
# vi /etc/sysconfig/network-scripts/ifcfg-bond.100
DEVICE=bond0.100
VLAN=yes
BOOTPROTO=none
ONBOOT=yes
TYPE=Unknown
BRIDGE=cloudbr100
The bridge can now be configured with the desired IP address for storage connectivity:
# vi /etc/sysconfig/network-scripts/ifcfg-cloudbr100
DEVICE=cloudbr100
ONBOOT=yes
TYPE=Bridge
VLAN=yes
IPADDR=10.0.100.20
NETMASK=255.255.255.0
NM_CONTROLLED=no
DELAY=0
Internal bridge cloud0
When using linux bridge networking there is no requirement to configure the internal “cloud0” bridge, this is all handled by CloudStack.
Network startup
Note – once all network startup scripts are in place and the network service is restarted you may lose connectivity to the host if there are any configuration errors in the files, hence make sure you have console access to rectify any issues.
To make the configuration live restart the network service:
# systemctl restart network
To check the bridges use the brctl command:
# brctl show
bridge name bridge id STP enabled interfaces
cloudbr0 8000.000c29b55932 no bond0
cloudbr1 8000.000c29b45956 no bond1
The bonds can be checked with:
# cat /proc/net/bonding/bond0
Ethernet Channel Bonding Driver: v3.7.1 (April 27, 2011)

Bonding Mode: fault-tolerance (active-backup)
Primary Slave: None
Currently Active Slave: eth0
MII Status: up
MII Polling Interval (ms): 100
Up Delay (ms): 0
Down Delay (ms): 0

Slave Interface: eth0
MII Status: up
Speed: 1000 Mbps
Duplex: full
Link Failure Count: 0
Permanent HW addr: 00:0c:xx:xx:xx:xx
Slave queue ID: 0

Slave Interface: eth1
MII Status: up
Speed: 1000 Mbps
Duplex: full
Link Failure Count: 0
Permanent HW addr: 00:0c:xx:xx:xx:xx
Slave queue ID: 0
Linux bridge configuration – Ubuntu
With the 18.04 “Bionic Beaver” release Ubuntu have retired the legacy way of configuring networking through /etc/network/interfaces in favour of Netplan – https://netplan.io/reference. This changes how networking is configured – although the principles around bridge configuration are the same as in previous Ubuntu versions.
First of all ensure correct hostname and FQDN are set in /etc/hostname and /etc/hosts respectively.
To stop network bridge traffic from traversing IPtables / ARPtables also add the following lines to /etc/sysctl.conf, this prevents bridge traffic from traversing IPtables / ARPtables on the host.
# vi /etc/sysctl.conf
net.bridge.bridge-nf-call-ip6tables = 0
net.bridge.bridge-nf-call-iptables = 0
net.bridge.bridge-nf-call-arptables = 0
Ubuntu 18.04 installs the “bridge-utils” and bridge/bonding kernel options by default, and the corresponding modules are also loaded by default, hence there are no requirements to add anything to /etc/modules.
In Ubuntu 18.04 all interface, bond and bridge configuration are configured using cloud-init and the Netplan configuration in /etc/netplan/XX-cloud-init.yaml. Same as for CentOS we are configuring basic active-passive bonds (mode=1) with status monitoring every 100ms (miimon=100), and configuring bridges on top of these. As before the host IP address is tied to cloudbr0:
# vi /etc/netplan/50-cloud-init.yaml
network:
    ethernets:
        eth0:
            dhcp4: no
        eth1:
            dhcp4: no
        eth2:
            dhcp4: no
        eth3:
            dhcp4: no
    bonds:
        bond0:
            dhcp4: no
            interfaces:
                - eth0
                - eth1
            parameters:
                mode: active-backup
                primary: eth0
        bond1:
            dhcp4: no
            interfaces:
                - eth2
                - eth3
            parameters:
                mode: active-backup
                primary: eth2
    bridges:
        cloudbr0:
            addresses:
                - 192.168.100.20/24
            gateway4: 192.168.100.1
            nameservers:
                search: [mycloud.local]
                addresses: [192.168.100.5,192.168.100.6]
            interfaces:
                - bond0
        cloudbr1:
            dhcp4: no
            interfaces:
                - bond1
    version: 2
Optional tagged interface for storage traffic
To add an options VLAN tagged interface for storage traffic add a VLAN and a new bridge to the above configuration:
# vi /etc/netplan/50-cloud-init.yaml
    vlans:
        bond100:
            id: 100
            link: bond0
            dhcp4: no
    bridges:
        cloudbr100:
            addresses:
               - 10.0.100.20/24
            interfaces:
               - bond100
Internal bridge cloud0
When using linux bridge networking the internal “cloud0” bridge is again handled by CloudStack, i.e. there’s no need for specific configuration to be specified for this.
Network startup
Note – once all network startup scripts are in place and the network service is restarted you may lose connectivity to the host if there are any configuration errors in the files, hence make sure you have console access to rectify any issues.
To make the configuration reload Netplan with
# netplan apply
To check the bridges use the brctl command:
# brctl show
bridge name	bridge id		STP enabled	interfaces
cloud0		8000.000000000000	no
cloudbr0	8000.52664b74c6a7	no		bond0
cloudbr1	8000.2e13dfd92f96	no		bond1
cloudbr100	8000.02684d6541db	no		bond100
To check the VLANs and bonds:
# cat /proc/net/vlan/config
VLAN Dev name | VLAN ID
Name-Type: VLAN_NAME_TYPE_RAW_PLUS_VID_NO_PAD
bond100 | 100 | bond0
# cat /proc/net/bonding/bond0
Ethernet Channel Bonding Driver: v3.7.1 (April 27, 2011)

Bonding Mode: fault-tolerance (active-backup)
Primary Slave: None
Currently Active Slave: eth1
MII Status: up
MII Polling Interval (ms): 100
Up Delay (ms): 0
Down Delay (ms): 0

Slave Interface: eth1
MII Status: up
Speed: 1000 Mbps
Duplex: full
Link Failure Count: 10
Permanent HW addr: 00:0c:xx:xx:xx:xx
Slave queue ID: 0

Slave Interface: eth0
MII Status: up
Speed: 1000 Mbps
Duplex: full
Link Failure Count: 10
Permanent HW addr: 00:0c:xx:xx:xx:xx
Slave queue ID: 0
OpenVswitch bridge configuration – CentOS
The OpenVswitch version in the standard CentOS repositories is relatively old (version 2.0). To install a newer version either locate and install this from a third party CentOS/Fedora/RedHat repository, alternatively download and compile the packages from the OVS website http://www.openvswitch.org/download/ (notes on how to compile the packages can be found in http://docs.openvswitch.org/en/latest/intro/install/fedora/).
Once packages are available install and enable OVS with
# yum localinstall openvswitch-<version>.rpm
# systemctl start openvswitch
# systemctl enable openvswitch
In addition to this the bridge module should be blacklisted. Experience has shown that even blacklisting this module does not prevent it from being loaded. To force this set the module install to /bin/false. Please note the CloudStack agent install depends on the bridge module being in place, hence this step should be carried out after agent install.
echo "install bridge /bin/false" > /etc/modprobe.d/bridge-blacklist.conf
As with linux bridging above the following examples assumes IPv6 has been disabled and legacy ethX network interface names are used. In addition the hostname has been set in /etc/sysconfig/network and /etc/hosts.
Add the initial OVS bridges using the ovs-vsctl toolset:
# ovs-vsctl add-br cloudbr0
# ovs-vsctl add-br cloudbr1
# ovs-vsctl add-bond cloudbr0 bond0 eth0 eth1
# ovs-vsctl add-bond cloudbr1 bond1 eth2 eth3
This will configure the bridges in the OVS database, but the settings will not be persistent. To make the settings persistent we need to configure the network configuration scripts in /etc/sysconfig/network-scripts/, similar to when using linux bridges.
Each individual network interface has a generic configuration – note there is no reference to bonds at this stage. The following ifcfg-eth script applies to all interfaces:
# vi /etc/sysconfig/network-scripts/ifcfg-eth0
DEVICE=eth0
TYPE=Ethernet
BOOTPROTO=none
NAME=eth0
ONBOOT=yes
NM_CONTROLLED=no
HOTPLUG=no
HWADDR=00:0C:xx:xx:xx:xx
The bonds reference the interfaces as well as the upstream bridge. In addition the bond configuration specifies the OVS specific settings for the bond (active-backup, no LACP, 100ms status monitoring):
# vi /etc/sysconfig/network-scripts/ifcfg-bond0
DEVICE=bond0
ONBOOT=yes
DEVICETYPE=ovs
TYPE=OVSBond
OVS_BRIDGE=cloudbr0
BOOTPROTO=none
BOND_IFACES="eth0 eth1"
OVS_OPTIONS="bond_mode=active-backup lacp=off other_config:bond-detect-mode=miimon other_config:bond-miimon-interval=100"
HOTPLUG=no
# vi /etc/sysconfig/network-scripts/ifcfg-bond1
DEVICE=bond1
ONBOOT=yes
DEVICETYPE=ovs
TYPE=OVSBond
OVS_BRIDGE=cloudbr1
BOOTPROTO=none
BOND_IFACES="eth2 eth3"
OVS_OPTIONS="bond_mode=active-backup lacp=off other_config:bond-detect-mode=miimon other_config:bond-miimon-interval=100"
HOTPLUG=no
The bridges are now configured as follows. The host IP address is specified on the untagged cloudbr0 bridge:
# vi /etc/sysconfig/network-scripts/ifcfg-cloudbr0
DEVICE=cloudbr0
ONBOOT=yes
DEVICETYPE=ovs
TYPE=OVSBridge
BOOTPROTO=static
IPADDR=192.168.100.20
NETMASK=255.255.255.0
GATEWAY=192.168.100.1
HOTPLUG=no
Cloudbr1 is configured without an IP address:
# vi /etc/sysconfig/network-scripts/ifcfg-cloudbr1
DEVICE=cloudbr1
ONBOOT=yes
DEVICETYPE=ovs
TYPE=OVSBridge
BOOTPROTO=none
HOTPLUG=no
Internal bridge cloud0
Under CentOS7.x and CloudStack 4.11 the cloud0 bridge is automatically configured, hence no additional configuration steps required.
Optional tagged interface for storage traffic
If a dedicated VLAN tagged IP interface is required for e.g. storage traffic this is accomplished by creating a VLAN tagged fake bridge on top of one of the cloud bridges. In this case we add it to cloudbr0 with VLAN 100:
# ovs-vsctl add-br cloudbr100 cloudbr0 100
# vi /etc/sysconfig/network-scripts/ifcfg-cloudbr100
DEVICE=cloudbr100
ONBOOT=yes
DEVICETYPE=ovs
TYPE=OVSBridge
BOOTPROTO=static
IPADDR=10.0.100.20
NETMASK=255.255.255.0
OVS_OPTIONS="cloudbr0 100"
HOTPLUG=no
Additional OVS network settings
To finish off the OVS network configuration specify the hostname, gateway and IPv6 settings:
vim /etc/sysconfig/network
NETWORKING=yes
HOSTNAME=kvmhost1.mylab.local
GATEWAY=192.168.100.1
NETWORKING_IPV6=no
IPV6INIT=no
IPV6_AUTOCONF=no
VLAN problems when using OVS
Kernel versions older than 3.3 had some issues with VLAN traffic propagating between KVM hosts. This has not been observed in CentOS 7.5 (kernel version 3.10) – however if this issue is encountered look up the OVS VLAN splinter workaround.
Network startup
Note – as mentioned for linux bridge networking – once all network startup scripts are in place and the network service is restarted you may lose connectivity to the host if there are any configuration errors in the files, hence make sure you have console access to rectify any issues.
To make the configuration live restart the network service:
# systemctl restart network
To check the bridges use the ovs-vsctl command. The following shows the optional cloudbr100 on VLAN 100:
# ovs-vsctl show
49cba0db-a529-48e3-9f23-4999e27a7f72
    Bridge "cloudbr0";
        Port "cloudbr0";
            Interface "cloudbr0"
                type: internal
        Port "cloudbr100"
            tag: 100
            Interface "cloudbr100"
                type: internal
        Port "bond0"
            Interface "veth0";
            Interface "eth0"
    Bridge "cloudbr1"
        Port "bond1"
            Interface "eth1"
            Interface "veth1"
        Port "cloudbr1"
            Interface "cloudbr1"
                type: internal
    Bridge "cloud0"
        Port "cloud0"
            Interface "cloud0"
                type: internal
    ovs_version: "2.9.2"
The bond status can be checked with the ovs-appctl command:
ovs-appctl bond/show bond0
---- bond0 ----
bond_mode: active-backup
bond may use recirculation: no, Recirc-ID : -1
bond-hash-basis: 0
updelay: 0 ms
downdelay: 0 ms
lacp_status: off
active slave mac: 00:0c:xx:xx:xx:xx(eth0)

slave eth0: enabled
active slave
may_enable: true

slave eth1: enabled
may_enable: true
To ensure that only OVS bridges are used also check that linux bridge control returns no bridges:
# brctl show
bridge name	bridge id		STP enabled	interfaces
As a final note – the CloudStack agent also requires the following two lines added to /etc/cloudstack/agent/agent.properties after install:
network.bridge.type=openvswitch
libvirt.vif.driver=com.cloud.hypervisor.kvm.resource.OvsVifDriver
OpenVswitch bridge configuration – Ubuntu
As discussed earlier in this blog post Ubuntu 18.04 introduced Netplan as a replacement to the legacy “/etc/network/interfaces” network configuration. Unfortunately Netplan does not support OVS, hence the first challenge is to revert Ubuntu to the legacy configuration method.
To disable Netplan first of all add “netcfg/do_not_use_netplan=true” to the GRUB_CMDLINE_LINUX option in /etc/default/grub. The following example also shows the use of legacy interface names as well as IPv6 being disabled:
GRUB_CMDLINE_LINUX="net.ifnames=0 biosdevname=0 ipv6.disable=1 netcfg/do_not_use_netplan=true"
Then rebuild GRUB and reboot the server:
grub-mkconfig -o /boot/grub/grub.cfg
To set the hostname first of all edit “/etc/cloud/cloud.cfg” and set this to preserve the system hostname:
preserve_hostname: true
Thereafter set the hostname with hostnamectl:
hostnamectl set-hostname --static --transient --pretty <hostname>
Now remove Netplan, install OVS from the Ubuntu repositories as well the “ifupdown” package to get standard network functionality back:
apt-get purge nplan netplan.io
apt-get install openvswitch-switch
apt-get install ifupdown
As for CentOS we need to blacklist the bridge module to prevent standard bridges being created. Please note the CloudStack agent install depends on the bridge module being in place, hence this step should be carried out after agent install.
echo "install bridge /bin/false" > /etc/modprobe.d/bridge-blacklist.conf
To stop network bridge traffic from traversing IPtables / ARPtables also add the following lines to /etc/sysctl.conf:
# vi /etc/sysctl.conf
net.bridge.bridge-nf-call-ip6tables = 0
net.bridge.bridge-nf-call-iptables = 0
net.bridge.bridge-nf-call-arptables = 0
Same as for CentOS we first of all add the OVS bridges and bonds from command line using the ovs-vsctl command line tools. In this case we also add the additional tagged fake bridge cloudbr100 on VLAN 100:
# ovs-vsctl add-br cloudbr0
# ovs-vsctl add-br cloudbr1
# ovs-vsctl add-bond cloudbr0 bond0 eth0 eth1 bond_mode=active-backup other_config:bond-detect-mode=miimon other_config:bond-miimon-interval=100
# ovs-vsctl add-bond cloudbr1 bond1 eth2 eth3 bond_mode=active-backup other_config:bond-detect-mode=miimon other_config:bond-miimon-interval=100
# ovs-vsctl add-br cloudbr100 cloudbr0 100
As for linux bridge all network configuration is applied in “/etc/network/interfaces”:
# vi /etc/network/interfaces
# The loopback network interface
auto lo
iface lo inet loopback

# The primary network interface
iface eth0 inet manual
iface eth1 inet manual
iface eth2 inet manual
iface eth3 inet manual

auto cloudbr0
allow-ovs cloudbr0
iface cloudbr0 inet static
address 192.168.100.20
netmask 255.255.155.0
gateway 192.168.100.100
dns-nameserver 192.168.100.5
ovs_type OVSBridge
ovs_ports bond0

allow-cloudbr0 bond0
iface bond0 inet manual
ovs_bridge cloudbr0
ovs_type OVSBond
ovs_bonds eth0 eth1
ovs_option bond_mode=active-backup other_config:miimon=100

auto cloudbr1
allow-ovs cloudbr1
iface cloudbr1 inet manual

allow-cloudbr1 bond1
iface bond1 inet manual
ovs_bridge cloudbr1
ovs_type OVSBond
ovs_bonds eth2 eth3
ovs_option bond_mode=active-backup other_config:miimon=100
Network startup
Since Ubuntu 14.04 the bridges have started automatically without any requirement for additional startup scripts. Since OVS uses the same toolset across both CentOS and Ubuntu the same processes as described earlier in this blog post can be utilised.
# ovs-appctl bond/show bond0
# ovs-vsctl show
To ensure that only OVS bridges are used also check that linux bridge control returns no bridges:
# brctl show
bridge name	bridge id		STP enabled	interfaces
As mentioned earlier the following also needs added to the /etc/cloudstack/agent/agent.properties file:
network.bridge.type=openvswitch
libvirt.vif.driver=com.cloud.hypervisor.kvm.resource.OvsVifDriver
Internal bridge cloud0
In Ubuntu there is no requirement to add additional configuration for the internal cloud0 bridge, CloudStack manages this.
Optional tagged interface for storage traffic
Additional VLAN tagged interfaces are again accomplished by creating a VLAN tagged fake bridge on top of one of the cloud bridges. In this case we add it to cloudbr0 with VLAN 100 at the end of the interfaces file:
# ovs-vsctl add-br cloudbr100 cloudbr0 100
# vi /etc/network/interfaces
auto cloudbr100
allow-cloudbr0 cloudbr100
iface cloudbr100 inet static
address 10.0.100.20
netmask 255.255.255.0
ovs_type OVSIntPort
ovs_bridge cloudbr0
ovs_options tag=100
Conclusion
As KVM is becoming more stable and mature, more people are going to start looking at using it rather that the more traditional XenServer or vSphere solutions, and we hope this article will assist in configuring host networking. As always we’re happy to receive feedback , so please get in touch with any comments, questions or suggestions.
About The Author
Dag Sonstebo is a Cloud Architect at ShapeBlue, The Cloud Specialists. Dag spends most of his time designing, implementing and automating IaaS solutions based on Apache CloudStack.
Giles is CEO and founder of ShapeBlue and is responsible for overall company strategy, strategic relationships, finance and sales.
He is also a committer and PMC member of the Apache CloudStack project and Chairman of the European Cloudstack User Group, actively helping promote brand awareness of the technology.
Giles can regularly be heard speaking at events around the globe, delivering visionary talks on cloud computing adoption and more specifically on Cloudstack technologies.
Before ShapeBlue, Giles held C-Level technology positions for 15 years including founder and CEO of Octavia Information Systems, a leading UK Managed Service Provider.
Giles holds a BSc in Engineering Physics from Sheffield Hallam University. Outside work, Giles is married with two teenage children. He coaches children’s rugby, is a competitive masters swimmer and can regularly be seen crying when his beloved Tottenham Hotspur lose.